ADK调用外部工具与接入MCP流程
课程说明:
- 体验课内容节选自《2025大模型Agent智能体开发实战》(7月班) 完整版付费课程
体验课时间有限,若想深度学习大模型技术,欢迎大家报名由我主讲的《2025大模型Agent智能体开发实战》(7月班)

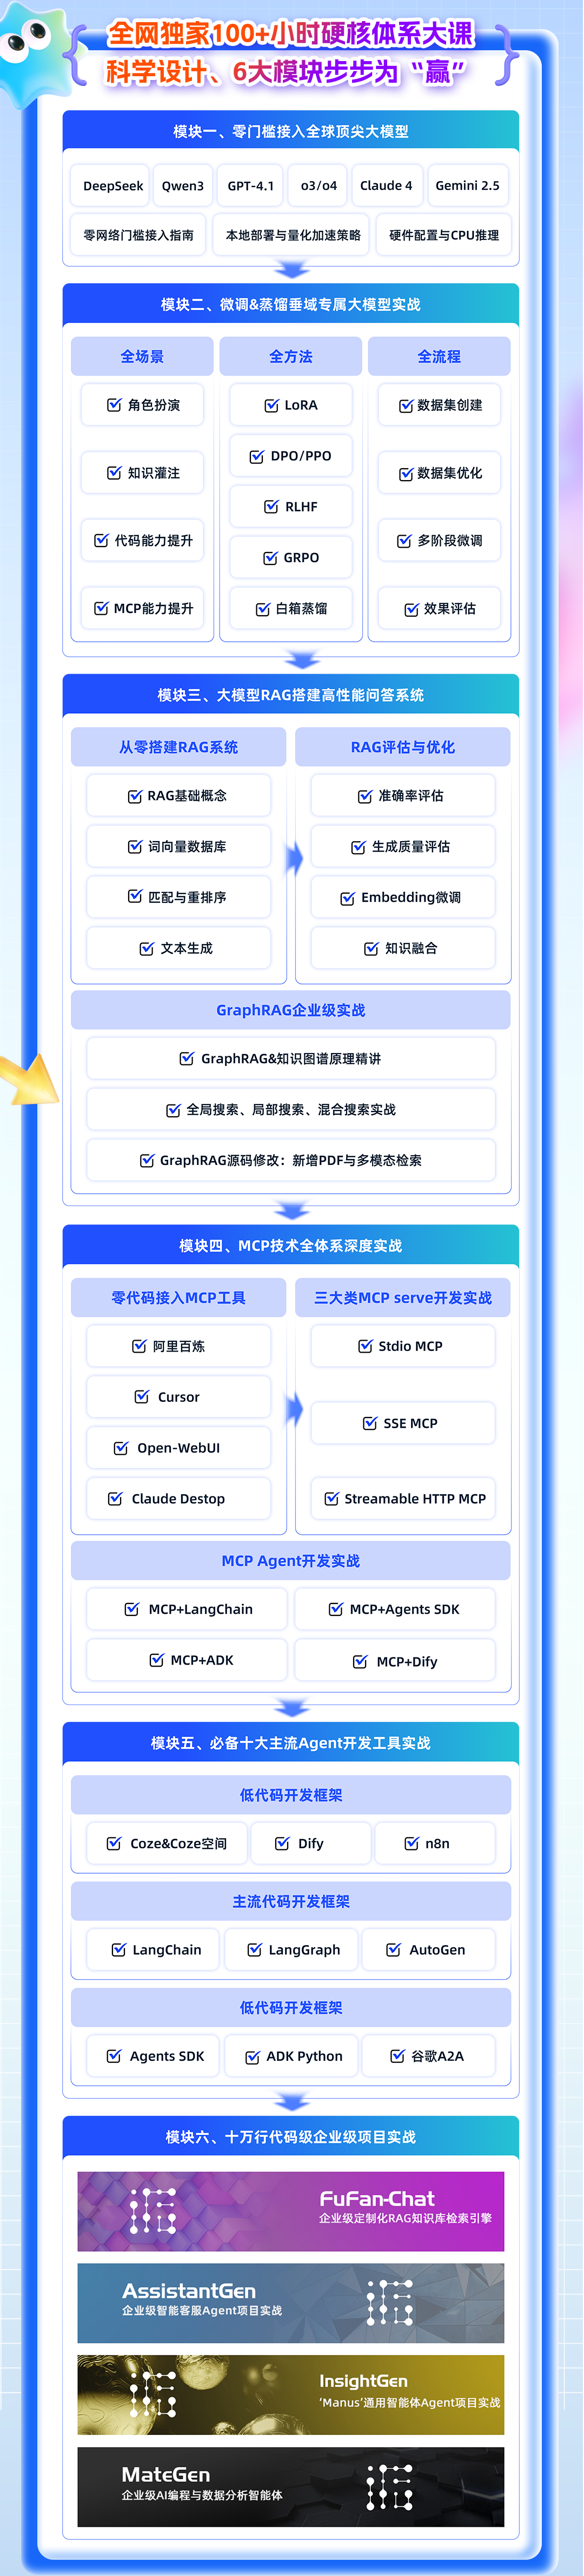
《2025大模型Agent智能体开发实战》(7月班) 为【100+小时】体系大课,总共20大模块精讲精析,零基础直达大模型企业级应用!
部分项目成果演示
from IPython.display import Video
- MateGen项目演示
Video("https://ml2022.oss-cn-hangzhou.aliyuncs.com/MG%E6%BC%94%E7%A4%BA%E8%A7%86%E9%A2%91.mp4", width=800, height=400)
- 智能客服项目演示
Video("https://ml2022.oss-cn-hangzhou.aliyuncs.com/%E6%99%BA%E8%83%BD%E5%AE%A2%E6%9C%8D%E6%A1%88%E4%BE%8B%E8%A7%86%E9%A2%91.mp4", width=800, height=400)
- Dify项目演示
Video("https://ml2022.oss-cn-hangzhou.aliyuncs.com/2f1b47f42c65fd59e8d3a83e6cb9f13b_raw.mp4", width=800, height=400)
- LangChain&LangGraph搭建Multi-Agnet
Video("https://ml2022.oss-cn-hangzhou.aliyuncs.com/%E5%8F%AF%E8%A7%86%E5%8C%96%E6%95%B0%E6%8D%AE%E5%88%86%E6%9E%90Multi-Agent%E6%95%88%E6%9E%9C%E6%BC%94%E7%A4%BA%E6%95%88%E6%9E%9C.mp4", width=800, height=400)
- GraphRAG+多模态文档检索
Video("https://ml2022.oss-cn-hangzhou.aliyuncs.com/7%E6%9C%8817%E6%97%A5%281%29%20%E8%BF%9B%E5%BA%A6%E6%9D%A1.mp4", width=800, height=400)
此外,若是对大模型底层原理感兴趣,也欢迎报名由我和菜菜老师共同主讲的《2025大模型原理与实战课程》(夏季班)

两门大模型课程五周年特惠进行中!现在下单可享开课来最低特价+各期课程全部福利,合购还有更多优惠哦~详细信息扫码添加助教,回复“大模型”,即可领取课程大纲&查看课程详情👇


五周年庆特别直播
谷歌开源Agent框架ADK调用外部工具流程
Video("https://ml2022.oss-cn-hangzhou.aliyuncs.com/3088c0e4409fe7a1cc024ed7eb5321a5_raw.mp4", width=800, height=400)
import os
from dotenv import load_dotenv
load_dotenv(override=True)

import os
import asyncio
from google.adk.agents import Agent
from google.adk.models.lite_llm import LiteLlm
from google.adk.sessions import InMemorySessionService
from google.adk.runners import Runner
from google.genai import types
DS_API_KEY = os.getenv("DS_API_KEY")
DS_BASE_URL = os.getenv("DS_BASE_URL")
model = LiteLlm(
    model="deepseek/deepseek-chat",
    api_base=DS_BASE_URL,
    api_key=DS_API_KEY
)
一、ADK接入外部工具基本流程
接下来我们继续探讨对于Agent开发框架的来说非常核心的议题,那就是如何连接并调用外部工具,并据此进一步探讨ADK的事件流管理流程。
1. 查询天气外部函数准备
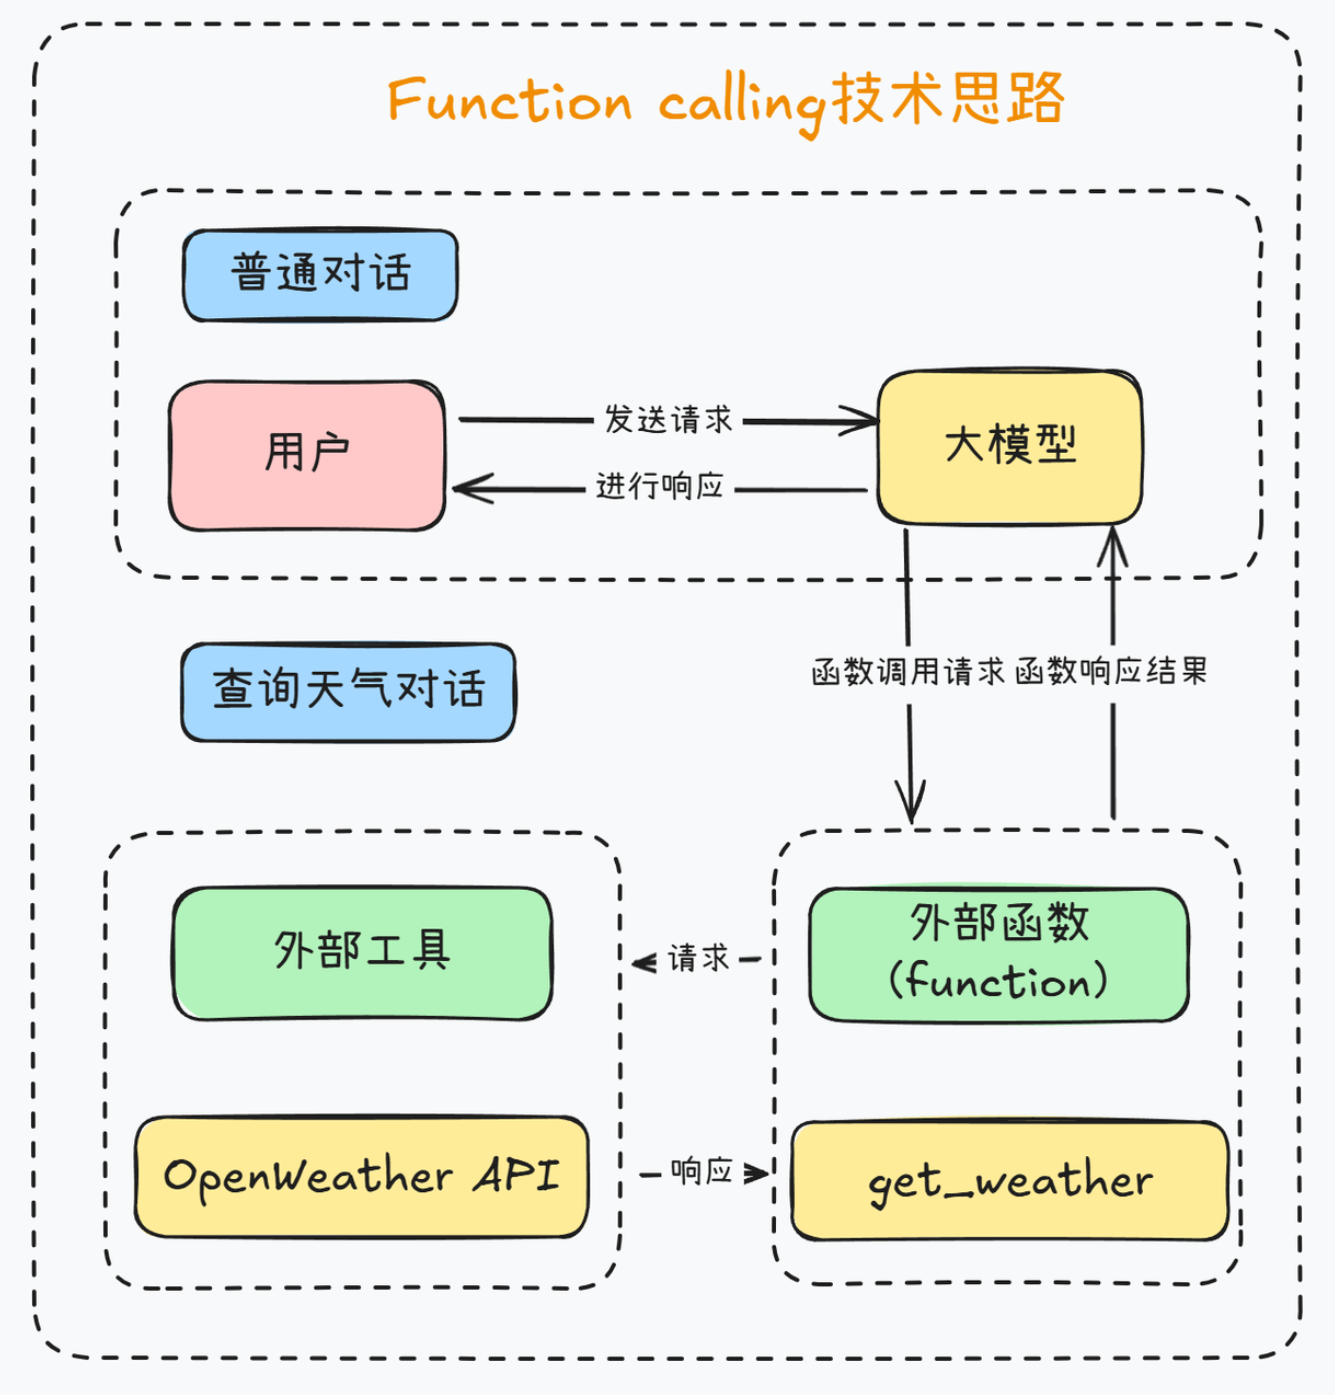
这里我们还是创建一个经典的查询天气的外部函数,需要注意的是,对于大多数Agent开发框架来说(ADK也是一样),Agent框架对外部函数的调用能力大都源自于基础模型本身的Function calling能力,因此这里首先我们先简单回顾大模型Function calling基本执行流程。
- 大模型原始Function calling功能执行流程
对于部分支持Function calling功能的模型来说,可以借助Function calling这种特殊的模型响应形式来调用外部函数,而Agents SDK在进行外部工具调用的时候,并没有通过某些方法让模型诞生Function calling功能,而是通过一些流程,增加了Function calling执行的稳定性、以及简化了调用代码。例如,对于DeepSeek-V3模型来说,原始的Function calling执行流程如下:

例如,当我们要查询当前天气时,让大模型调用外部工具的function calling的过程就如图所示:
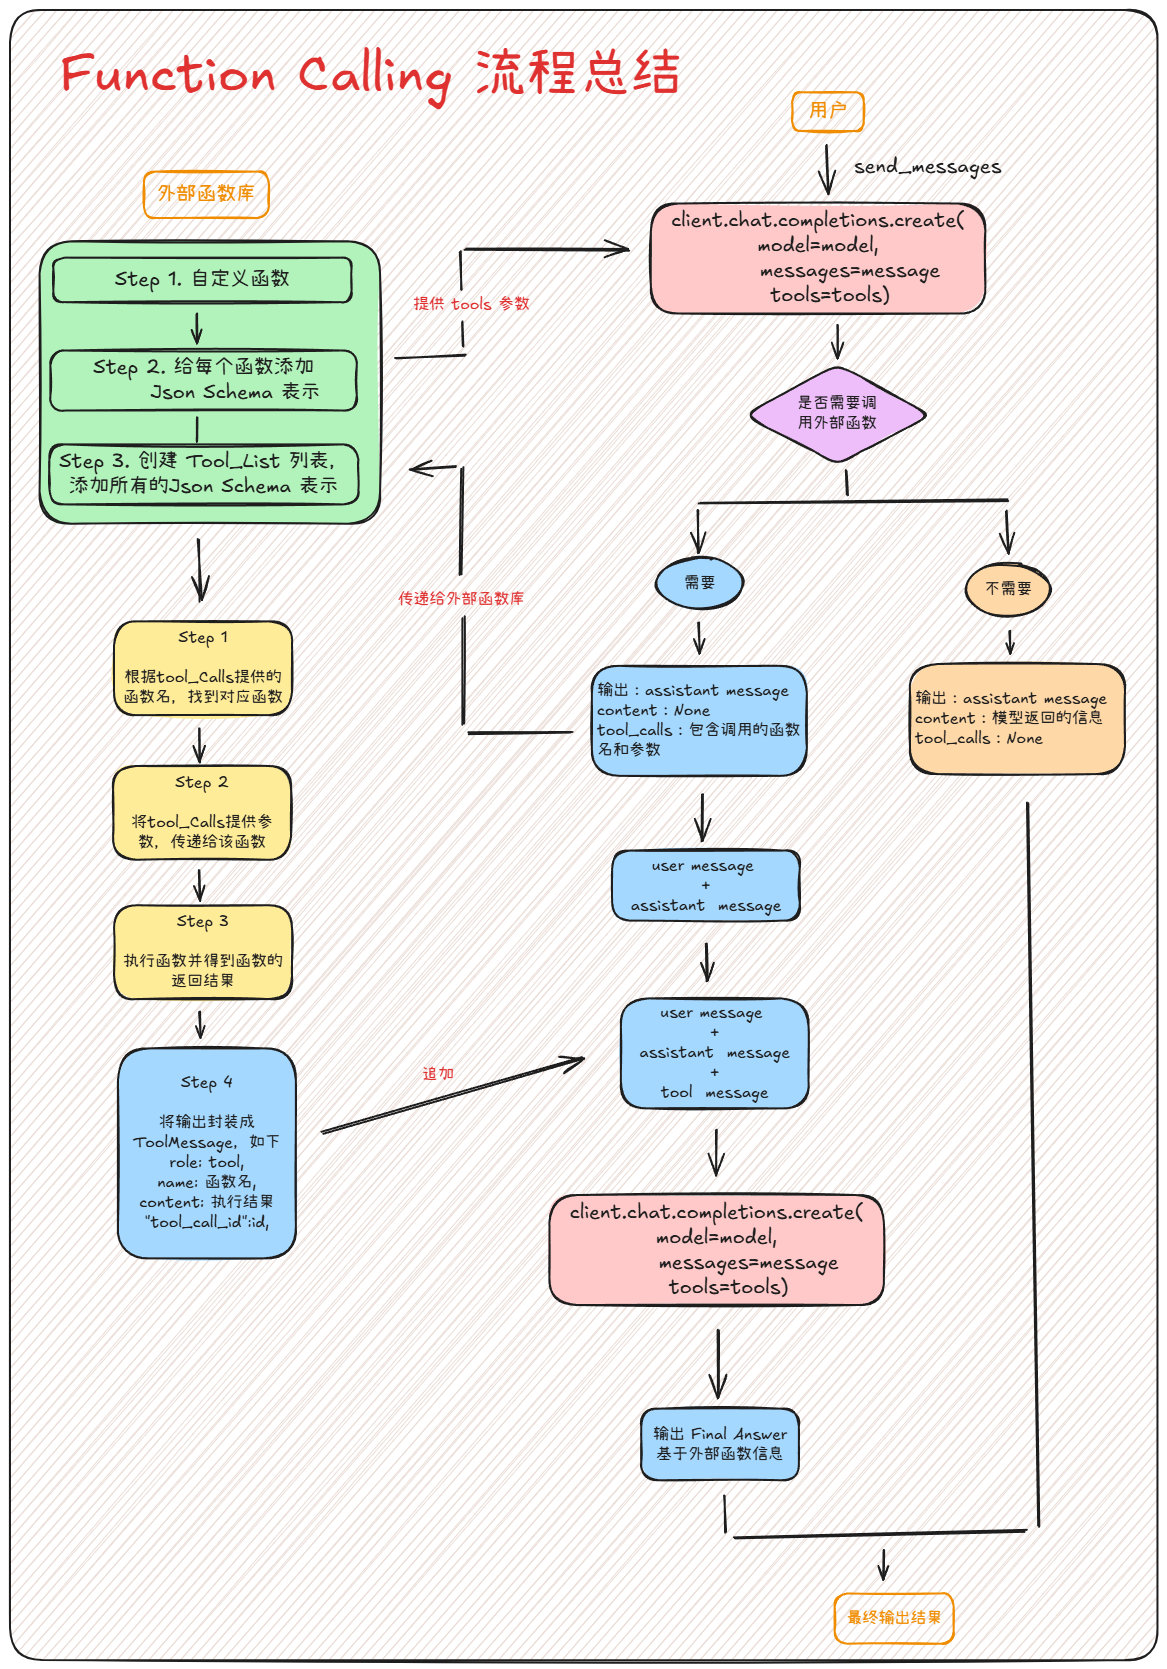
而完整的一次Function calling执行流程如下:
更多DeepSeek执行流程参考:
下图扫码即可领取:

- 简单测试外部工具能否顺利运行
import requests,json
def get_weather(city: str) -> str:
    """
    Retrieves the current weather report for a specified city.

    Args:
        city (str): The name of the city (e.g., "Beijing", "Shanghai").
                   Note: For cities in China, use the city's English name (e.g., "Beijing").

    Returns:
        dict: A dictionary containing the weather information.
              Includes a 'status' key ('success' or 'error').
              If 'success', includes a 'report' key with weather details.
              If 'error', includes an 'error_message' key.
    """
    # Step 1.构建请求
    url = "https://api.openweathermap.org/data/2.5/weather"

    # Step 2.设置查询参数
    params = {
        "q": city,
        "appid": os.getenv("OPENWEATHER_API_KEY"),    # 输入自己的API key
        "units": "metric",            # 使用摄氏度而不是华氏度
        "lang":"zh_cn"                # 输出语言为简体中文
    }

    # Step 3.发送GET请求
    response = requests.get(url, params=params)

    # Step 4.解析响应
    data = response.json()
    city = data.get("name", "未知")
    country = data.get("sys", {}).get("country", "未知")
    temp = data.get("main", {}).get("temp", "N/A")
    humidity = data.get("main", {}).get("humidity", "N/A")
    wind_speed = data.get("wind", {}).get("speed", "N/A")
    weather_list = data.get("weather", [{}])
    description = weather_list[0].get("description", "未知")

    return (
        f"🌍 {city}, {country}\n"
        f"🌡 温度: {temp}°C\n"
        f"💧 湿度: {humidity}%\n"
        f"🌬 风速: {wind_speed} m/s\n"
        f"🌤 天气: {description}\n"
    )
get_weather(city="Beijing")
这里需要注意的是,ADK和其他Agent开发框架类似,都是根据函数描述来判断函数功能,因此请务必写清楚函数功能及函数参数。对于ADK来说,外部函数的功能说明必须按照Google Python Style Guide 格式进行编写,具体格式要求有以下几点:
- 简要描述:在docstring的开始部分简短描述函数的目的和行为。比如:
Retrieves the current weather report for a specified city.。 - Args:列出函数的参数,每个参数的类型和功能。并提供必要的注释。
- Returns:描述函数返回的类型及其内容。如果返回的是字典,应该具体说明字典中每个键的作用。
- 异常或错误处理(可选):如果有,通常会列出可能抛出的异常。
若不是按照这个格式进行编写,则有可能无法顺利识别外部函数。
2. 借助ADK构建天气查询Agent
接下来进一步借助ADK连接天气查询外部函数,并据此创建一个天气查询的Agent。
- Step 1.配置模型
model = LiteLlm(
    model="deepseek/deepseek-chat",
    api_base=DS_BASE_URL,
    api_key=DS_API_KEY
)
- Step 2.定义天气查询Agent
weather_agent = Agent(
    name="weather_agent",
    model=model,
    description="用于进行某地天气查询的Agent智能体",
    instruction="你是一个有帮助的天气助手。"
                "当用户询问特定城市的天气时,"
                "使用 'get_weather' 工具查找相关信息。"
                "如果工具返回错误,礼貌地告知用户。",
    tools=[get_weather],
)
print(f"Agent '{weather_agent.name}' created using model '{model}'.")
- Step 3.创建会话管理器
session_service = InMemorySessionService()
APP_NAME = "weather_app"
USER_ID = "user_1"
SESSION_ID = "session_001"
session = session_service.create_session(
    app_name=APP_NAME,
    user_id=USER_ID,
    session_id=SESSION_ID
)
print(f"Session created: App='{APP_NAME}', User='{USER_ID}', Session='{SESSION_ID}'")
- Step 4.创建智能体执行器(Runner)
runner = Runner(
    agent=weather_agent, # The agent we want to run
    app_name=APP_NAME,   # Associates runs with our app
    session_service=session_service # Uses our session manager
)
- Step 5.执行天气查询对话
query='你好,请问北京今天天气如何?'
USER_ID, SESSION_ID
async def call_agent_async(query: str, runner, user_id, session_id):
  """Sends a query to the agent and prints the final response."""
  print(f"\n>>> User Query: {query}")

  # Prepare the user's message in ADK format
  content = types.Content(role='user', parts=[types.Part(text=query)])

  final_response_text = "Agent did not produce a final response." # Default

  # Key Concept: run_async executes the agent logic and yields Events.
  # We iterate through events to find the final answer.
  async for event in runner.run_async(user_id=user_id, session_id=session_id, new_message=content):
      # You can uncomment the line below to see *all* events during execution
      print(f"  [Event] Author: {event.author}, Type: {type(event).__name__}, Final: {event.is_final_response()}, Content: {event.content}")

      # Key Concept: is_final_response() marks the concluding message for the turn.
      if event.is_final_response():
          if event.content and event.content.parts:
             # Assuming text response in the first part
             final_response_text = event.content.parts[0].text
          elif event.actions and event.actions.escalate: # Handle potential errors/escalations
             final_response_text = f"Agent escalated: {event.error_message or 'No specific message.'}"
          # Add more checks here if needed (e.g., specific error codes)
          break # Stop processing events once the final response is found

  print(f"<<< Agent Response: {final_response_text}")
await call_agent_async(query, runner, USER_ID, SESSION_ID)
最后我们获取最新的历史对话消息:
session = session_service.get_session(
    app_name=APP_NAME,
    user_id=USER_ID,
    session_id=SESSION_ID
)
for event in session.events:
    print(f"Author: {event.author}, Type: {type(event).__name__}, Content: {event.content}")
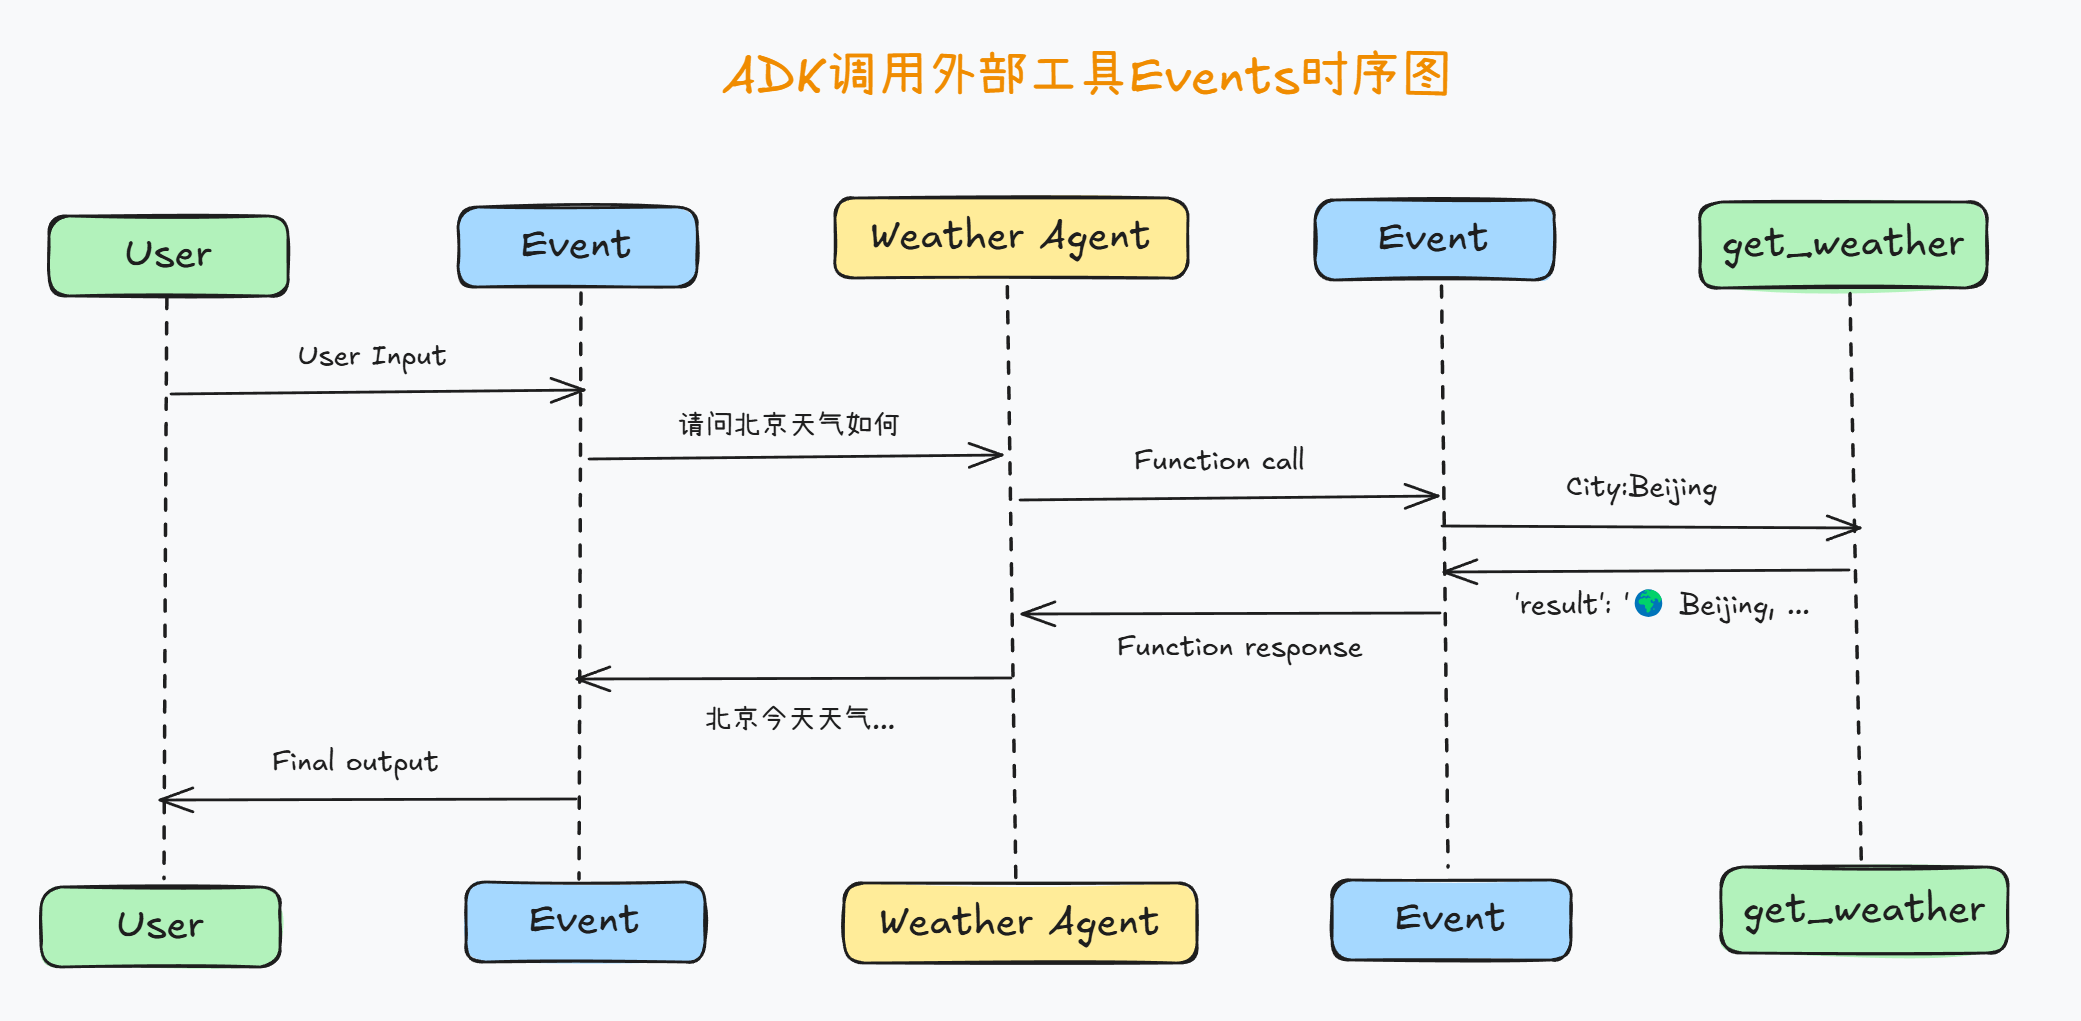
能够看出,在调用外部函数时事件流解释如下:
Part 1. 用户输入(User Query)
FENCE0
- 用户输入:用户询问的是 北京 的天气情况。这个消息会被
weather_agent接收并处理。
Part 2. 第一次事件(Event) - 调用外部函数
FENCE1
解释如下:
author:weather_agent— 表明这个事件是由weather_agent发出的,表示模型开始处理用户请求。type:Event— 表示这是一个事件对象,指示着某种操作(例如模型开始处理用户的输入)。Final:False— 这意味着这不是最终的响应,它是处理中间的一个事件,模型仍在执行某些操作。content: 这里的content包含了一个function_call,即 调用外部函数(get_weather):FunctionCall表示模型调用了一个外部函数(在这里是get_weather函数),并传递了参数city: 'Beijing'。function_response为空,表明这个事件只是发起了外部函数调用,函数的响应尚未返回。
Part 3. 第二次事件(Event) - 函数响应
FENCE2
解释如下:
author:weather_agent— 表示这是由weather_agent生成的事件。type:Event— 这是一个事件对象,表示某个操作的完成。Final:False— 这仍然不是最终的响应,事件仍在处理阶段。content: 这次的content中包含了function_response:function_response表示调用get_weather函数并获取了它的响应。返回的response包含了天气信息:温度、湿度、风速和天气状况。- 这些信息将被传递回
weather_agent,以便构建最终的回复给用户。
Part 4. 最终事件(Event) - 完成模型的响应
FENCE3
解释如下:
author:weather_agent— 这还是由weather_agent发出的事件,表示模型已经完成最终的响应。type:Event— 这是一个事件对象,表示模型生成的最终响应。Final:True— 这是最终的响应,标志着本轮对话的结束。content:text字段包含了最终的回复文本:- 这是 Agent 提供给用户的天气信息,包括温度、湿度、风速和天气描述。
Part 5. 最终用户响应
FENCE4
- 最终输出:这是 Agent 的回复内容,清晰地展示了北京的天气情况,包含了温度、湿度、风速和天气描述。
其中事件流的关键点:
function_call:表示模型调用了外部函数(例如get_weather)。function_response:表示外部函数返回的数据被模型接收到。Final=True:表示这是本轮对话的最终响应,标志着模型已准备好提供最终答案。
不难看出,这其实也就是一个经典的Function calling执行流程,完整事件流程可以用下图描述:
当然,我们同样可以继续使用call_agent_async函数进行多轮对话:
query = '那今天我应该穿什么衣服出门呀?'
await call_agent_async(query, runner, USER_ID, SESSION_ID)
完整历史对话如下:
session_service.sessions
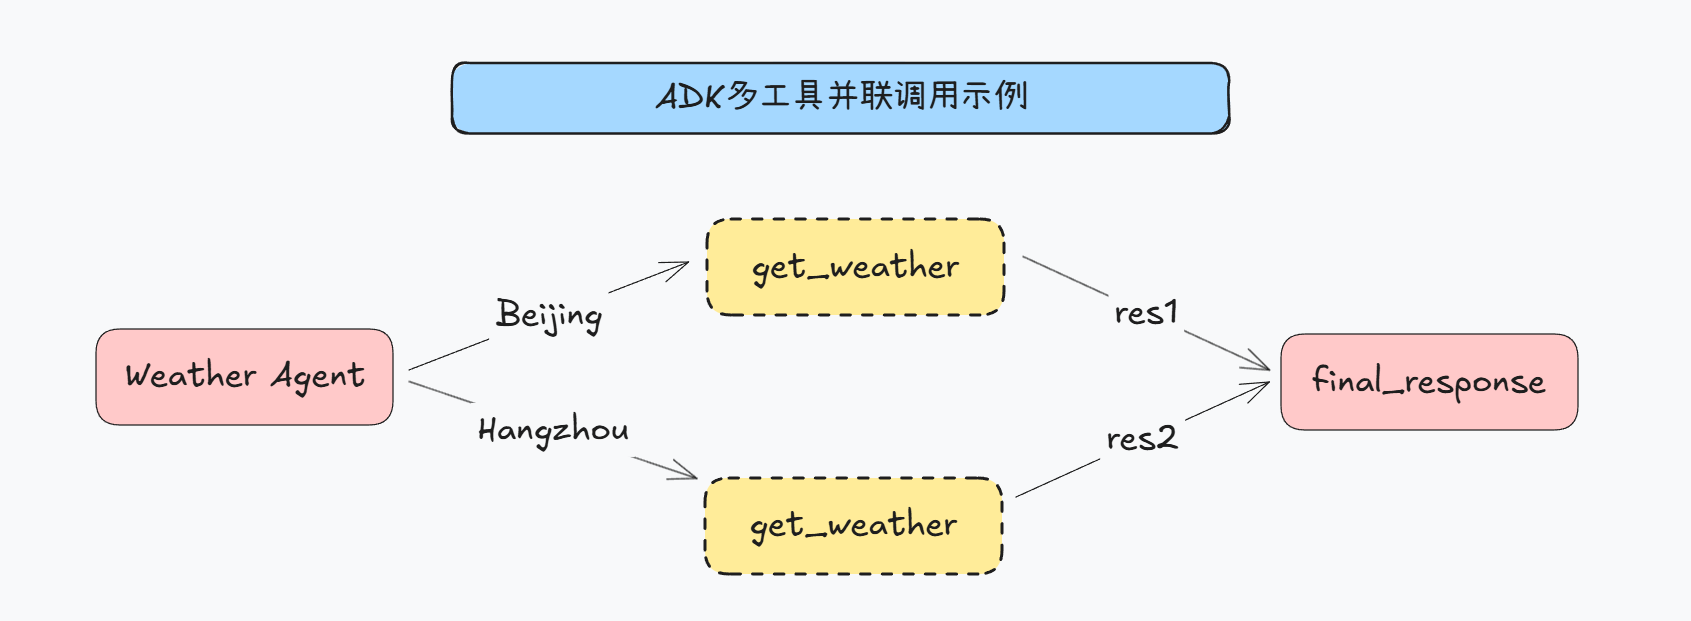
二、ADK并联和串联调用工具流程
既然是以Function calling为基础的工具调用,那肯定ADK肯定支持多工具并联和串联调用。通过工具的并联调用,就能快速在单独的Agent内部组成简单的工作流。
1. ADK的多工具并联调用
所谓并联调用,指的是在一次响应过程中,同时调用多项工具完成任务,例如同时询问北京和杭州天气时候,ADK会按照如下方式进行工具调用:
具体代码实现过程如下。
# 重新创建基础会话信息和会话存储器
session_service = InMemorySessionService()

APP_NAME = "weather_app"
USER_ID = "user_2"
SESSION_ID = "session_001"

session = session_service.create_session(
    app_name=APP_NAME,
    user_id=USER_ID,
    session_id=SESSION_ID
)
print(f"Session created: App='{APP_NAME}', User='{USER_ID}', Session='{SESSION_ID}'")
runner = Runner(
    agent=weather_agent, # The agent we want to run
    app_name=APP_NAME,   # Associates runs with our app
    session_service=session_service # Uses our session manager
)
query='你好,请问北京和杭州今天天气如何?'
await call_agent_async(query, runner, USER_ID, SESSION_ID)
注意观察此时的事件流,在第二个事件中(第一个事件是接收到用户消息),ADK同时发起了两次工具调用:
session_service.sessions['weather_app']['user_2']['session_001'].events[1]
如此即实现了工具的并联调用。
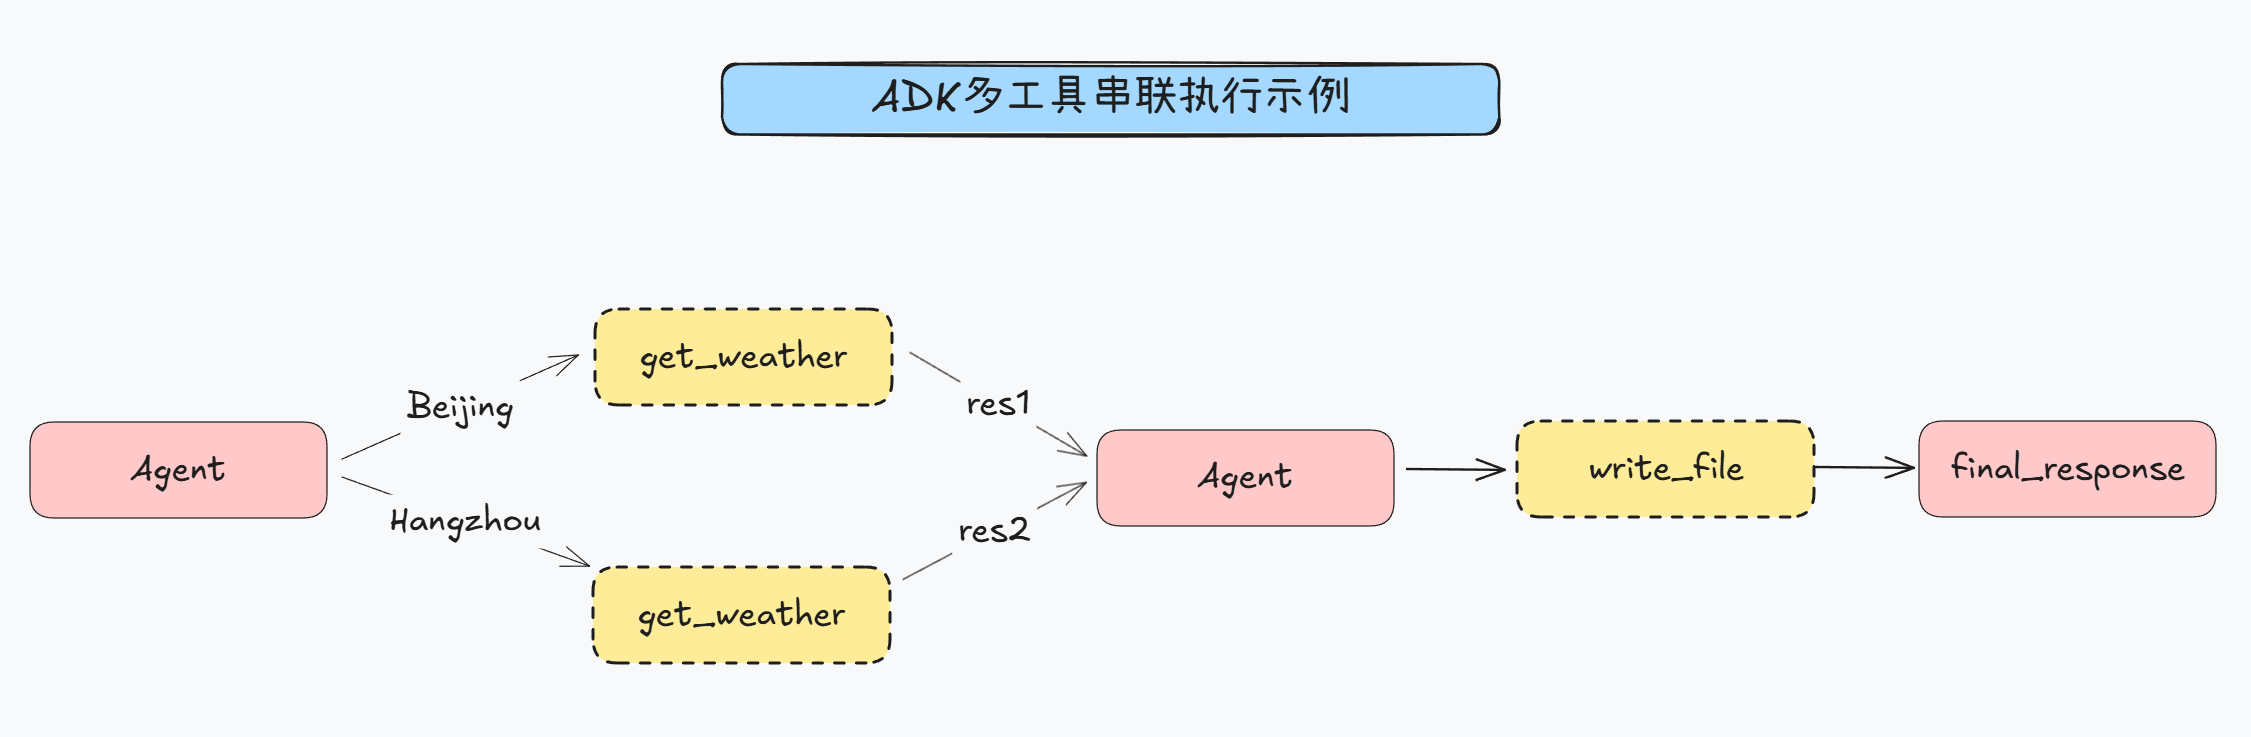
2. ADK的多工具串联调用
接下来继续介绍ADK的多工具串联调用方法。这里我们再创建一个函数,用于将查询到的天气信息“写入”本地文件中。
def write_file(content: str) -> str:
    """
    Writes the specified content to a local file.

    Args:
        content (str): The content to be written to the file.

    Returns:
        str: A message indicating whether the content was successfully written to the file.
             In this case, it returns "已成功写入本地文件" if the writing is successful.
    """

    return "已成功写入本地文件。"
# 重新创建基础会话信息和会话存储器
session_service = InMemorySessionService()

APP_NAME = "weather_app"
USER_ID = "user_2"
SESSION_ID = "session_002"

session = session_service.create_session(
    app_name=APP_NAME,
    user_id=USER_ID,
    session_id=SESSION_ID
)
print(f"Session created: App='{APP_NAME}', User='{USER_ID}', Session='{SESSION_ID}'")
# 重新创建Agent
multi_tool_agent = Agent(
    name="multi_tool_agent",
    model=model,
    description="用于进行天气查询和记录的智能体",
    instruction="你是一个乐于助人的助手。"
                "当用户询问特定城市的天气时,"
                "使用 'get_weather' 工具查找相关信息。"
                "当用户询需要将一些信息记录到本地的时候,"
                "使用 'write_file' 将指定内容记录到本地"
                "如果工具返回错误,礼貌地告知用户。",
    tools=[get_weather, write_file],
)

print(f"Agent '{multi_tool_agent.name}' created using model '{model}'.")
runner = Runner(
    agent=multi_tool_agent,
    app_name=APP_NAME,
    session_service=session_service
)
然后进行对话:
query='你好,请先帮我查询北京和杭州今天天气,再将其记录到本地文档中'
await call_agent_async(query, runner, USER_ID, SESSION_ID)
注意看,此时第二个事件是同时调用两次外部函数查询天气:
session_service.sessions['weather_app']['user_2']['session_002'].events[1]
第三个事件是查询到天气
session_service.sessions['weather_app']['user_2']['session_002'].events[2]
而紧接着第四个事件就是调用外部函数将天气信息写入本地:
session_service.sessions['weather_app']['user_2']['session_002'].events[3]
由此即完成了一个多工具串联调用执行流程,基本流程如下:
3. ADK工具调用报错处理流程
接下来我们继续介绍ADK在进行外部工具调用报错时的处理流程。需要注意的是,测试智能体开发框架的报错处理流程是至关重要的,无论是ADK还是OpenAI的Agents SDK,其智能体运行器Runner本质上都是执行一个loop,会一直执行到能获得一个结果为止。因此我们需要设置一个注定无法运行的外部函数,测试ADK在进行试错时会尝试几次:
def write_file_now(content: str) -> str:
    """
    Writes the specified content to a local file.

    Args:
        content (str): The content to be written to the file.

    Returns:
        str: A message indicating whether the content was successfully written to the file.
             In this case, it returns "已成功写入本地文件" if the writing is successful.
    """

    return "输入信息格式不对,未能成果写入本地"
# 重新创建基础会话信息和会话存储器
session_service = InMemorySessionService()

APP_NAME = "test_app"
USER_ID = "user_3"
SESSION_ID = "session_001"

session = session_service.create_session(
    app_name=APP_NAME,
    user_id=USER_ID,
    session_id=SESSION_ID
)
print(f"Session created: App='{APP_NAME}', User='{USER_ID}', Session='{SESSION_ID}'")
# 重新创建Agent
write_file_agent = Agent(
    name="write_file_agent",
    model=model,
    description="用于进行信息记录的智能体",
    instruction="你是一个乐于助人的助手。"
                "当用户询需要将一些信息记录到本地的时候,"
                "使用 'write_file_now' 将指定内容记录到本地"
                "如果工具返回错误,礼貌地告知用户。",
    tools=[write_file_now],
)

print(f"Agent '{multi_tool_agent.name}' created using model '{model}'.")
runner = Runner(
    agent=write_file_agent,
    app_name=APP_NAME,
    session_service=session_service
)
然后进行对话:
query='请帮我围绕智能体编写一首俳句,并写入本地文档。'
await call_agent_async(query, runner, USER_ID, SESSION_ID)
通过观察事件流不难发现,ADK在调用外部函数报错时,总共会尝试三次,属于正常范围,可以放心使用。
三、ADK+外部工具的前端调用与测试流程
1. ADK基础外部工具调用流程
接下来我们进一步尝试在Web端调用包含外部工具的ADK开发的Agent。借助Dev UI,我们能够更加直观的观察到Agent调用外部哦工具的事件流,并进行更高效率的开发。
顺着上一小节的前端项目继续,我们回到ADK_Chat文件夹中:
修改agent.py脚本:
FENCE0
删除原有内容,写入如下新的内容:
FENCE0
同时修改.env文件,新增一个用于进行天气查询的OPENWEATHER_API_KEY字段:
FENCE0

然后输入运行指令: FENCE0
即可在前端开启对话,测试多工具并联和串联调用:
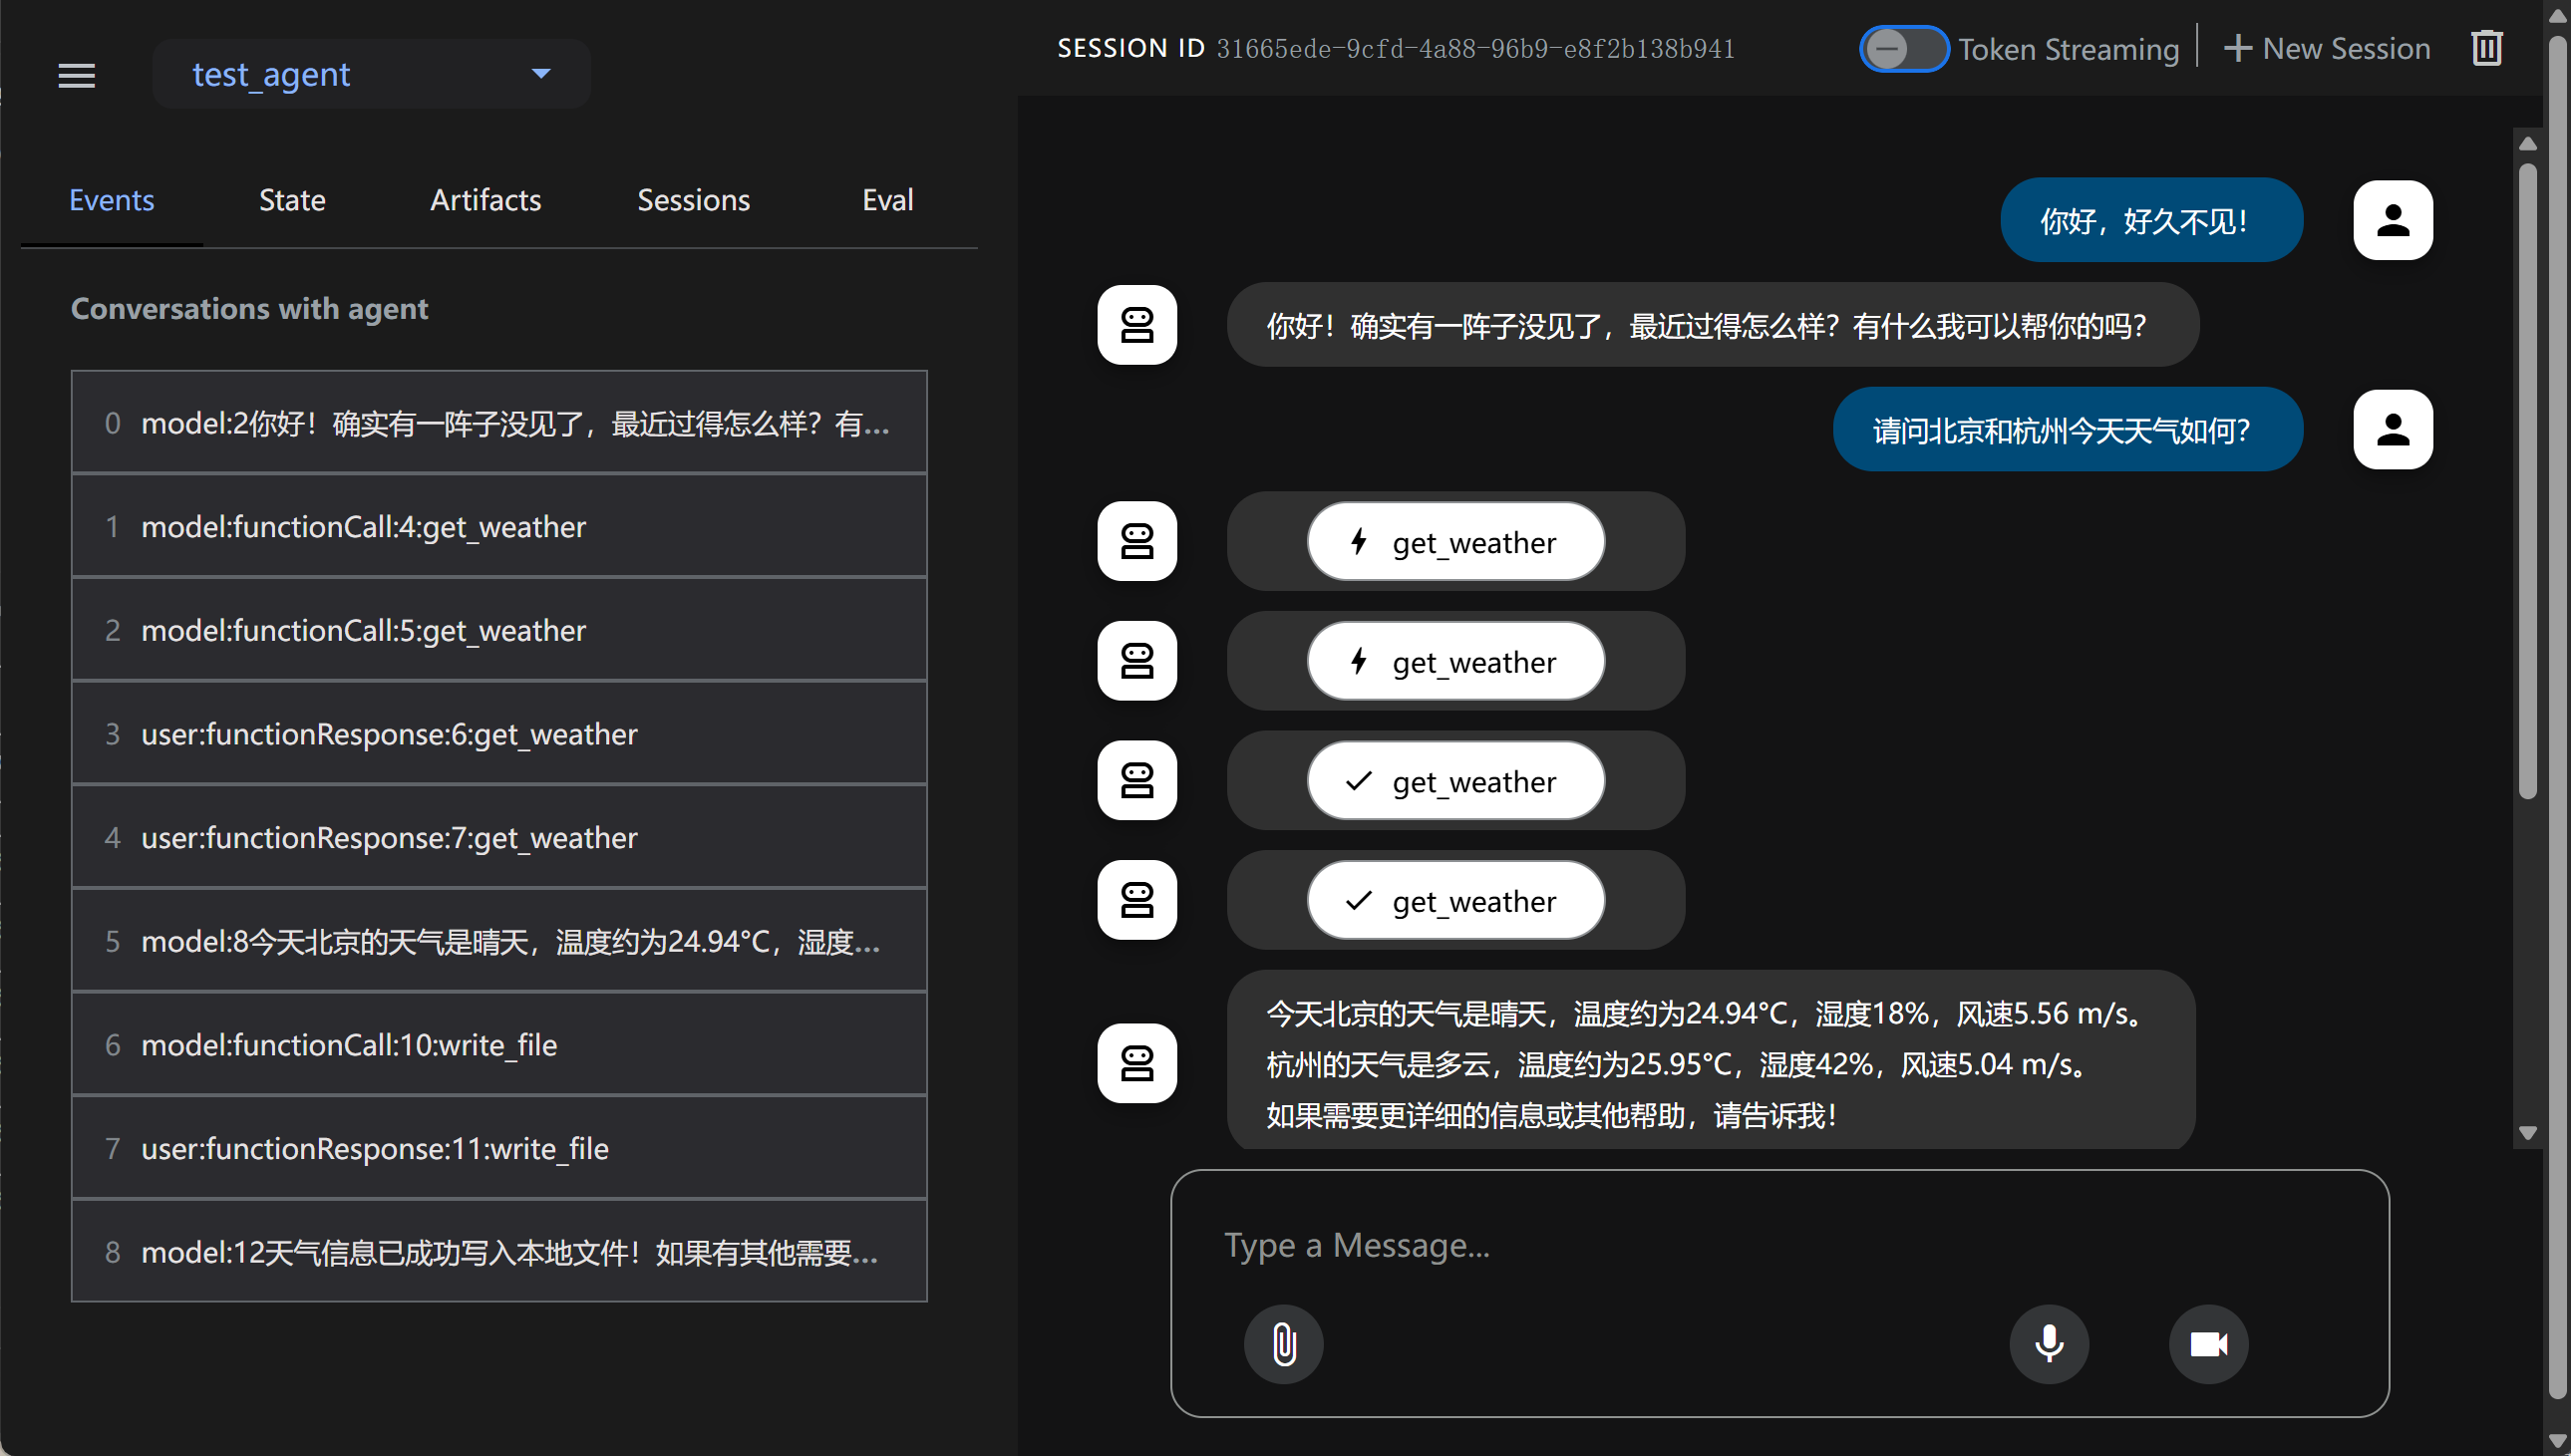
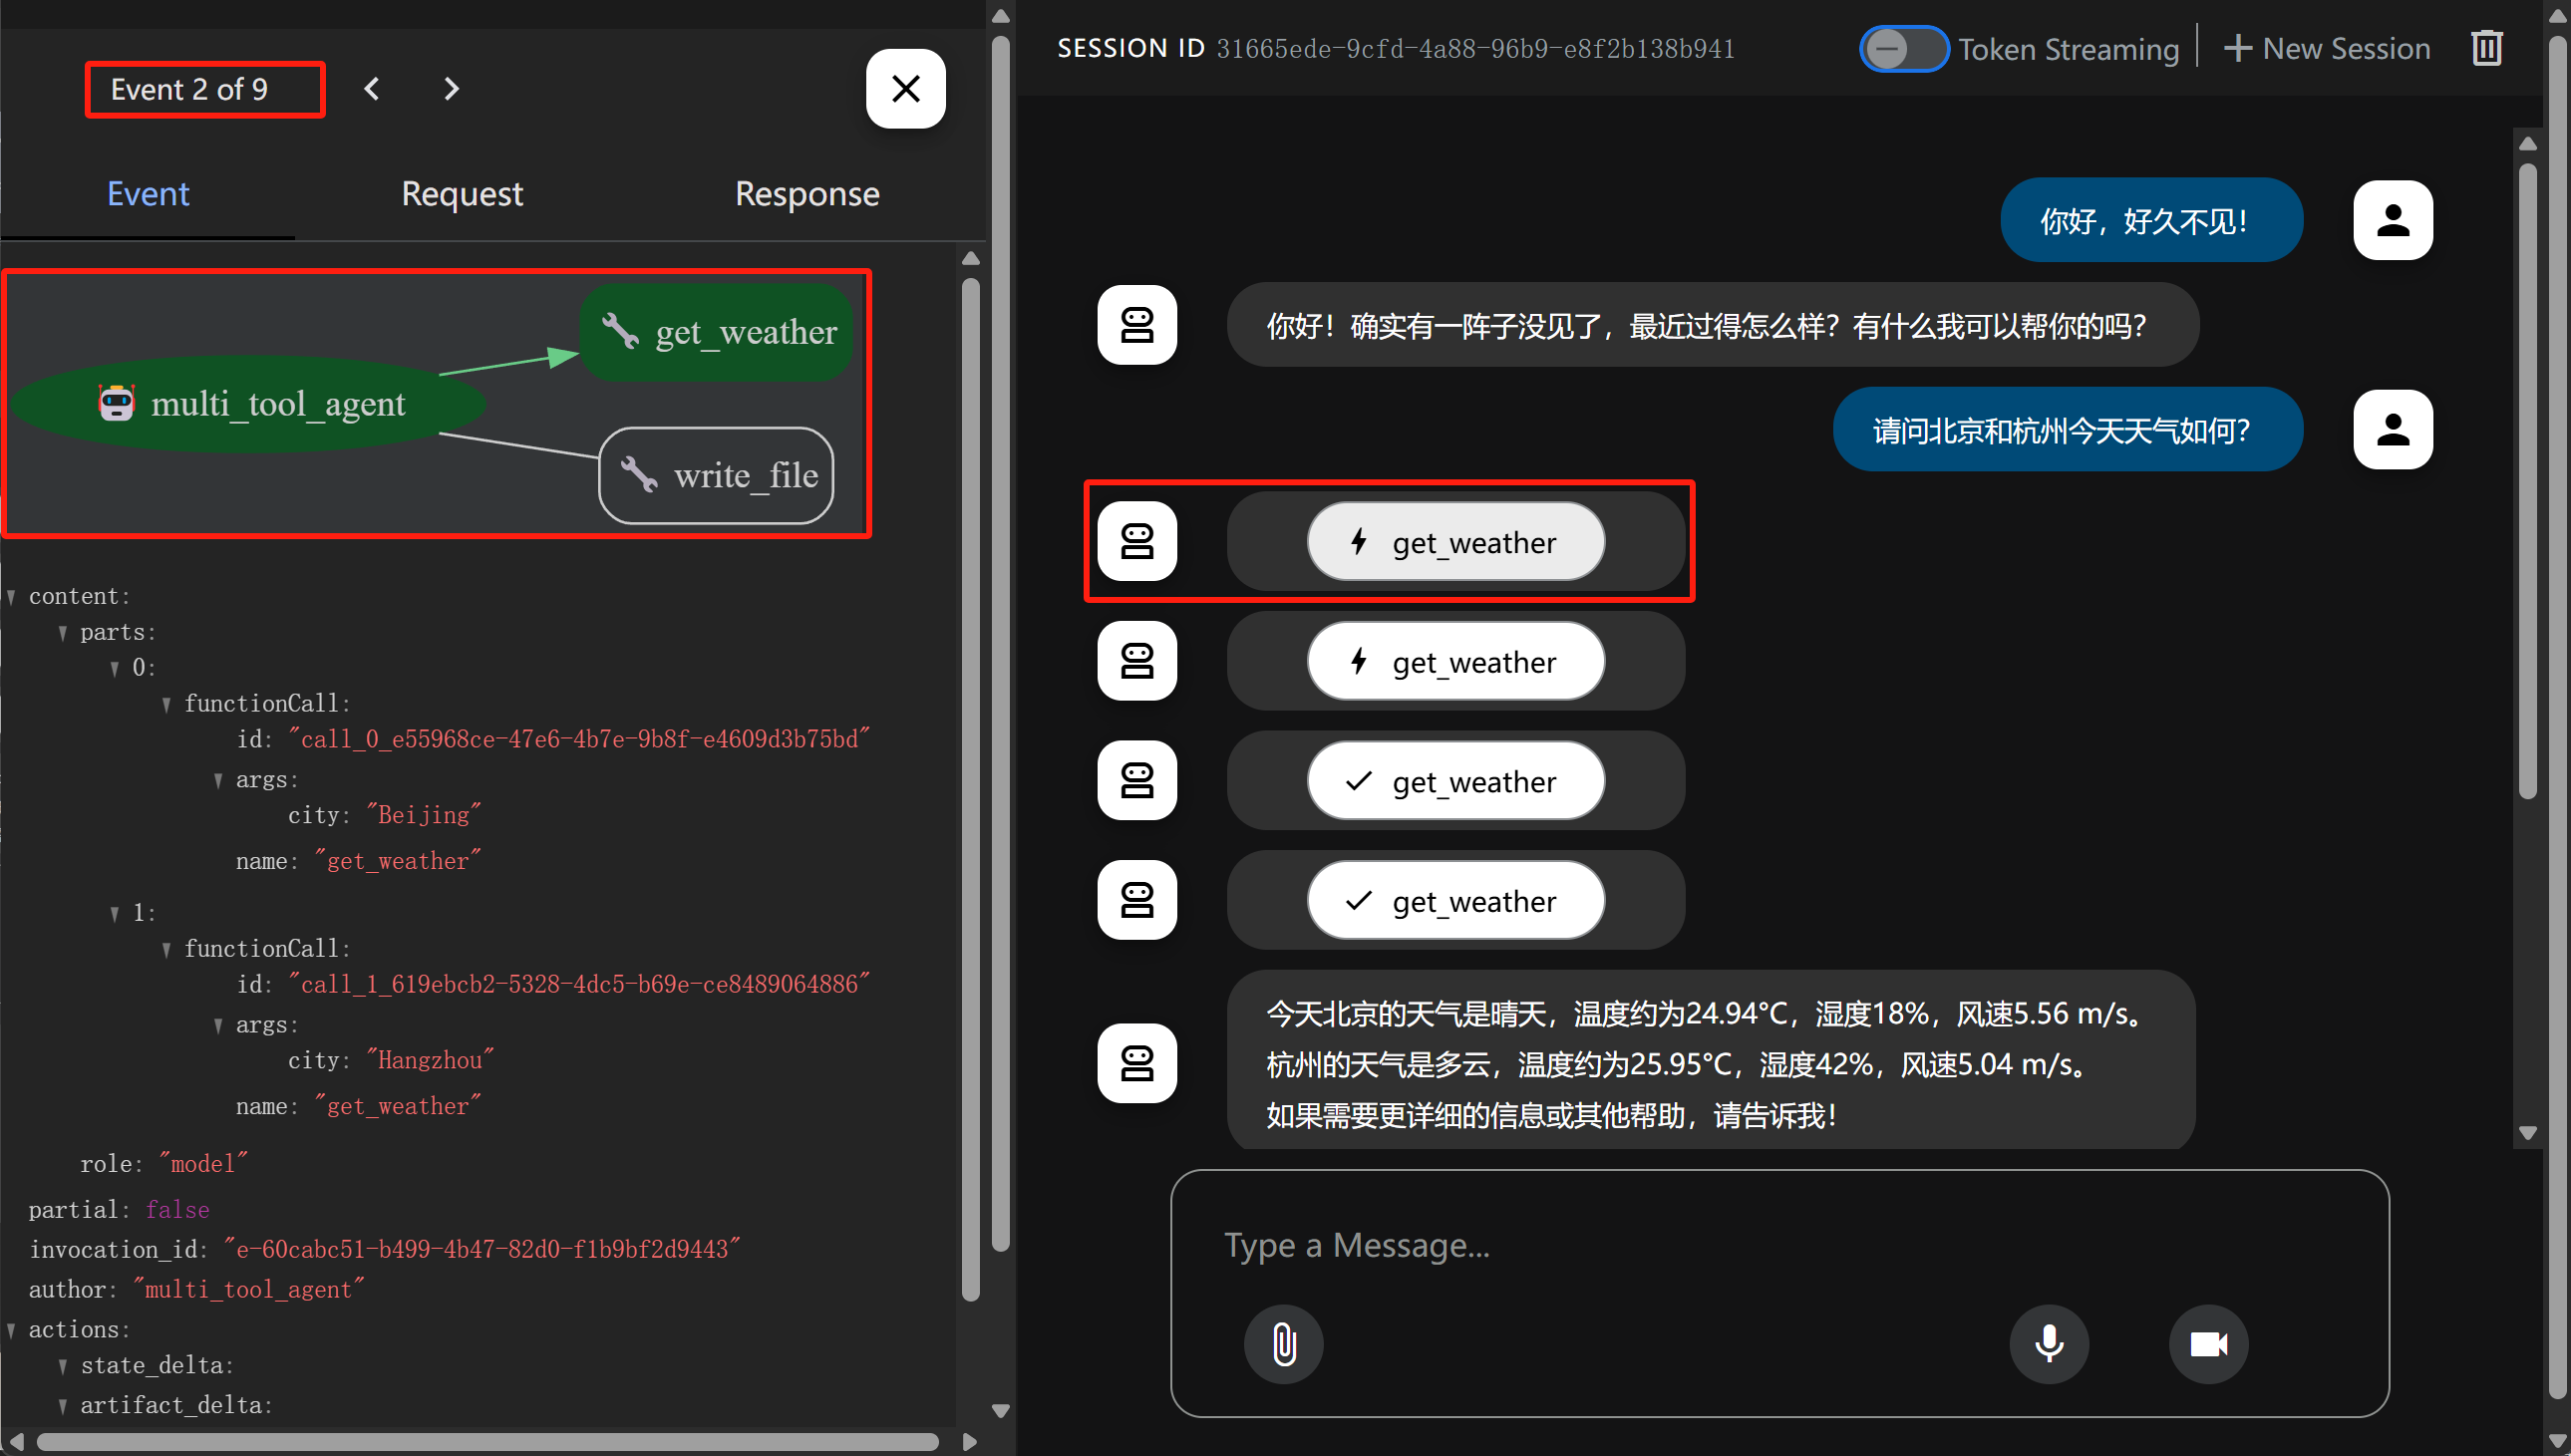
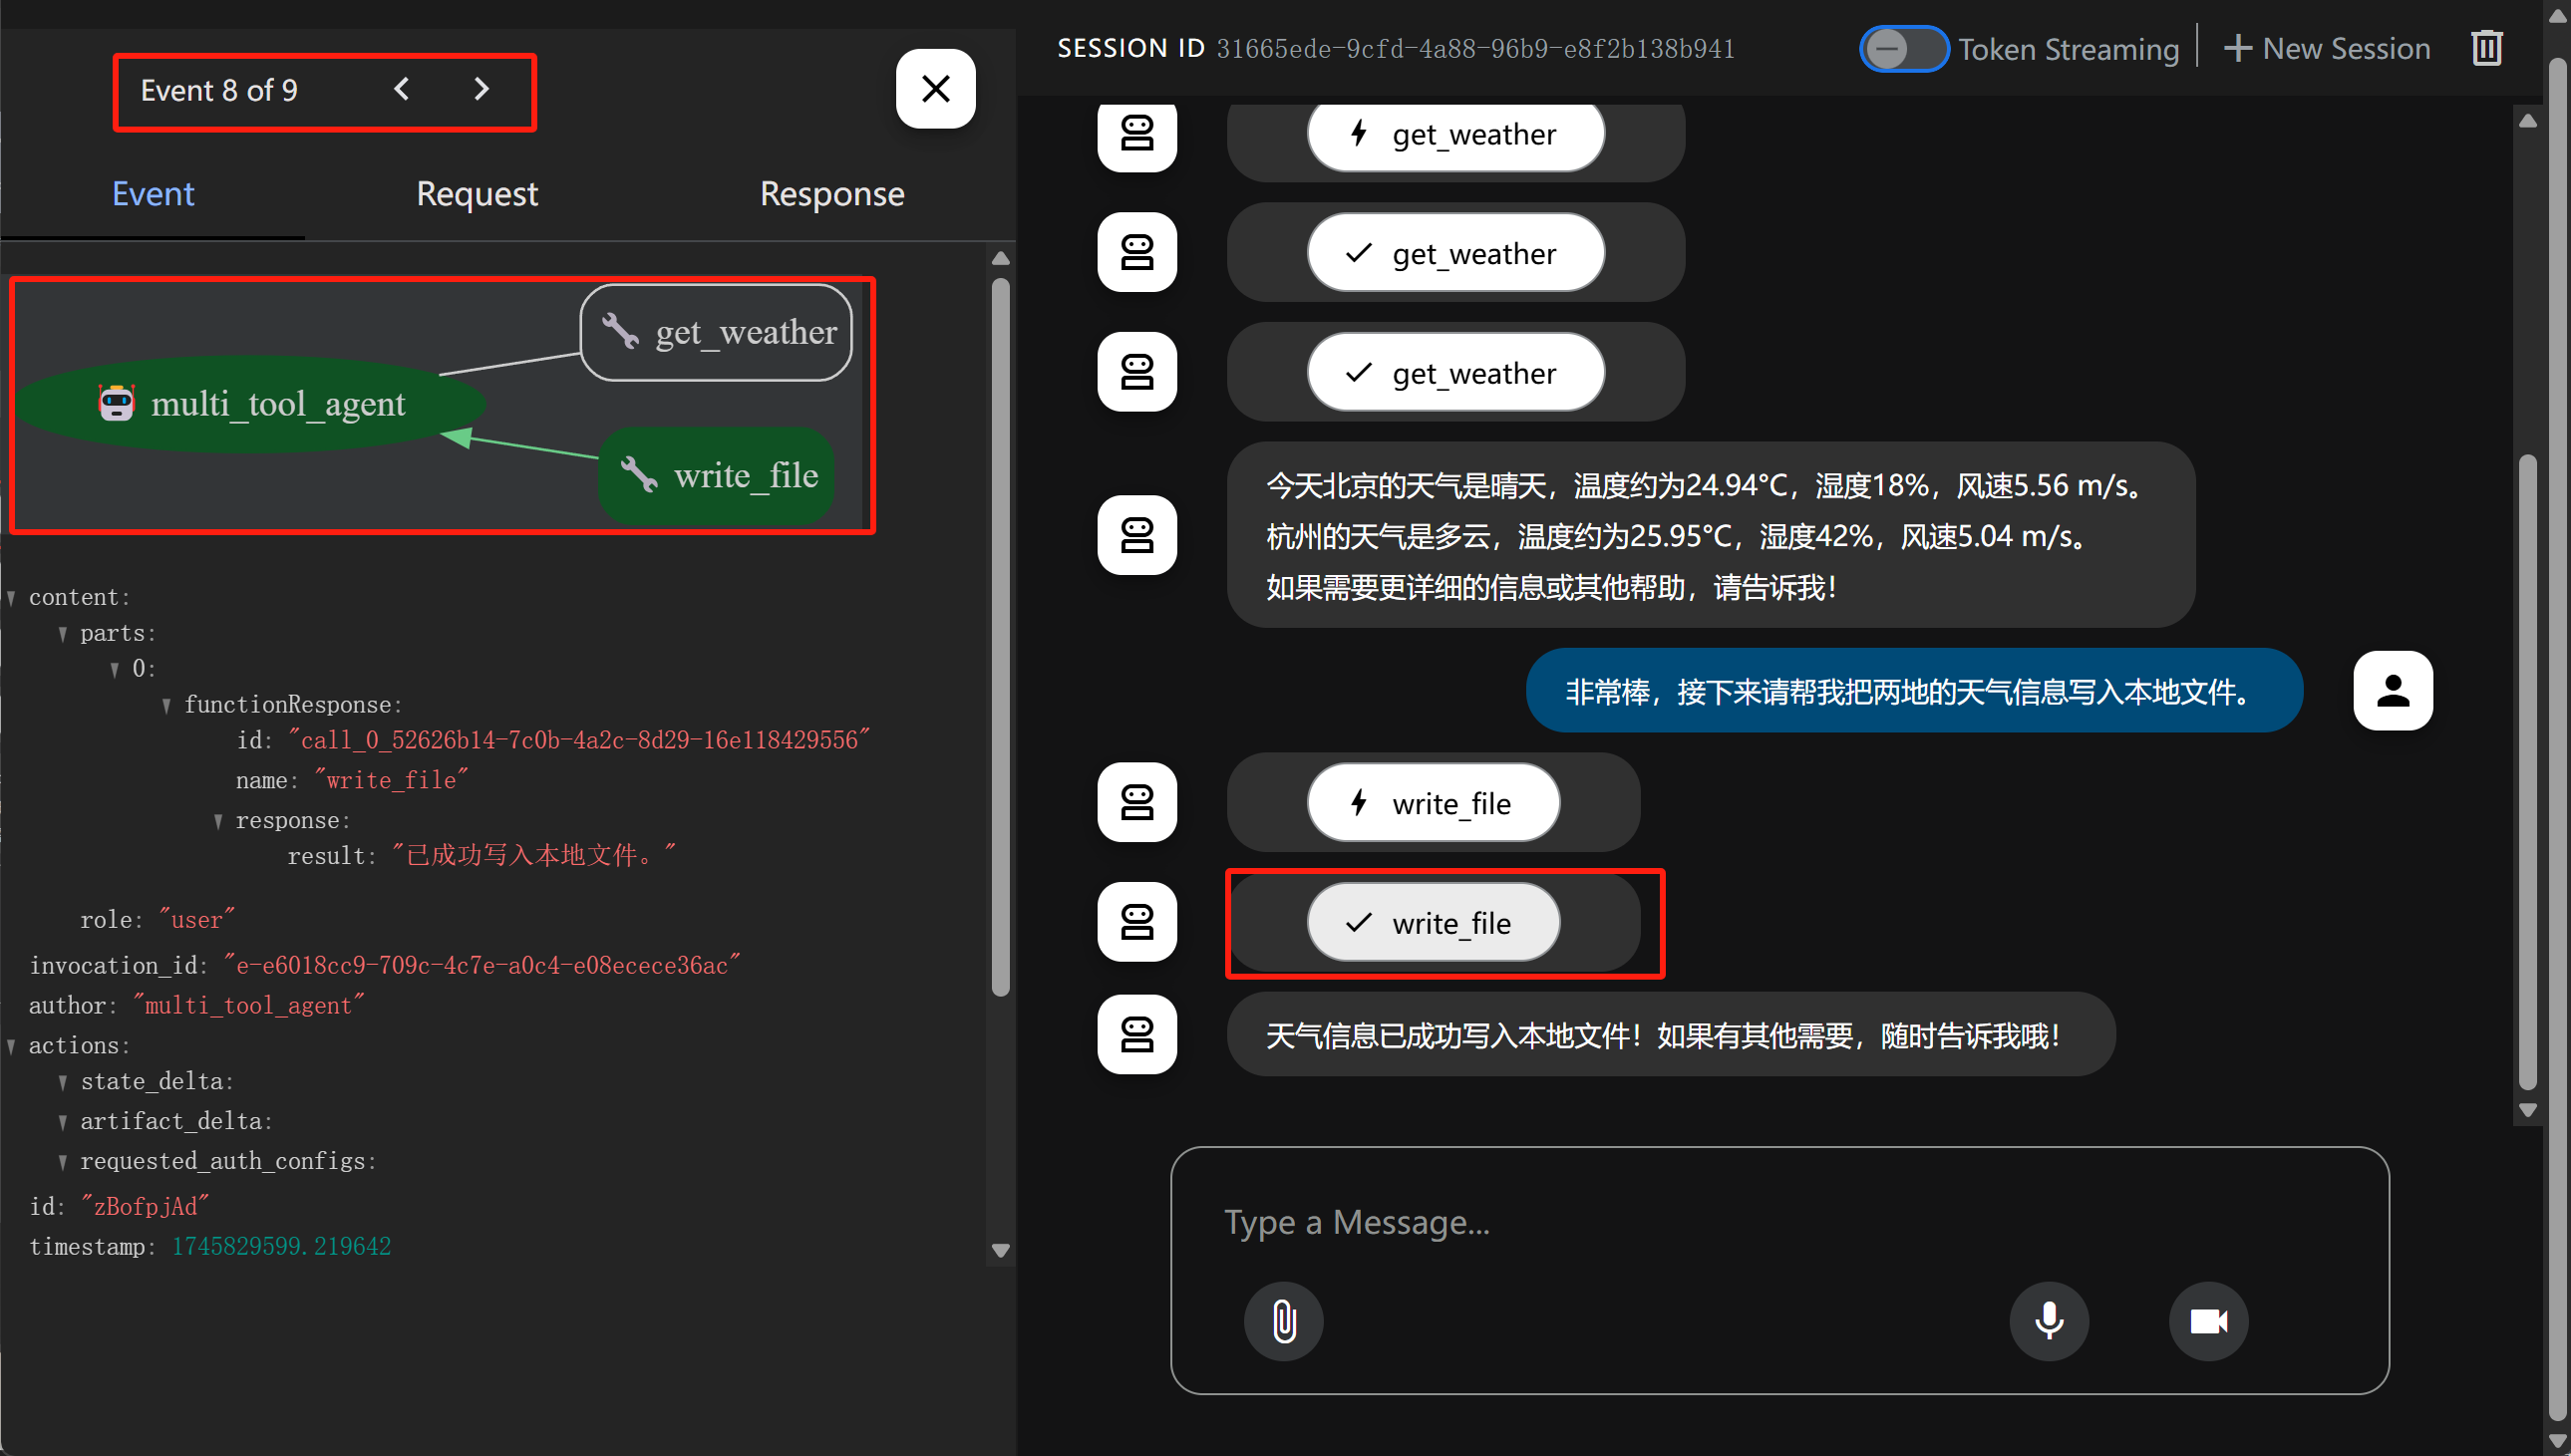
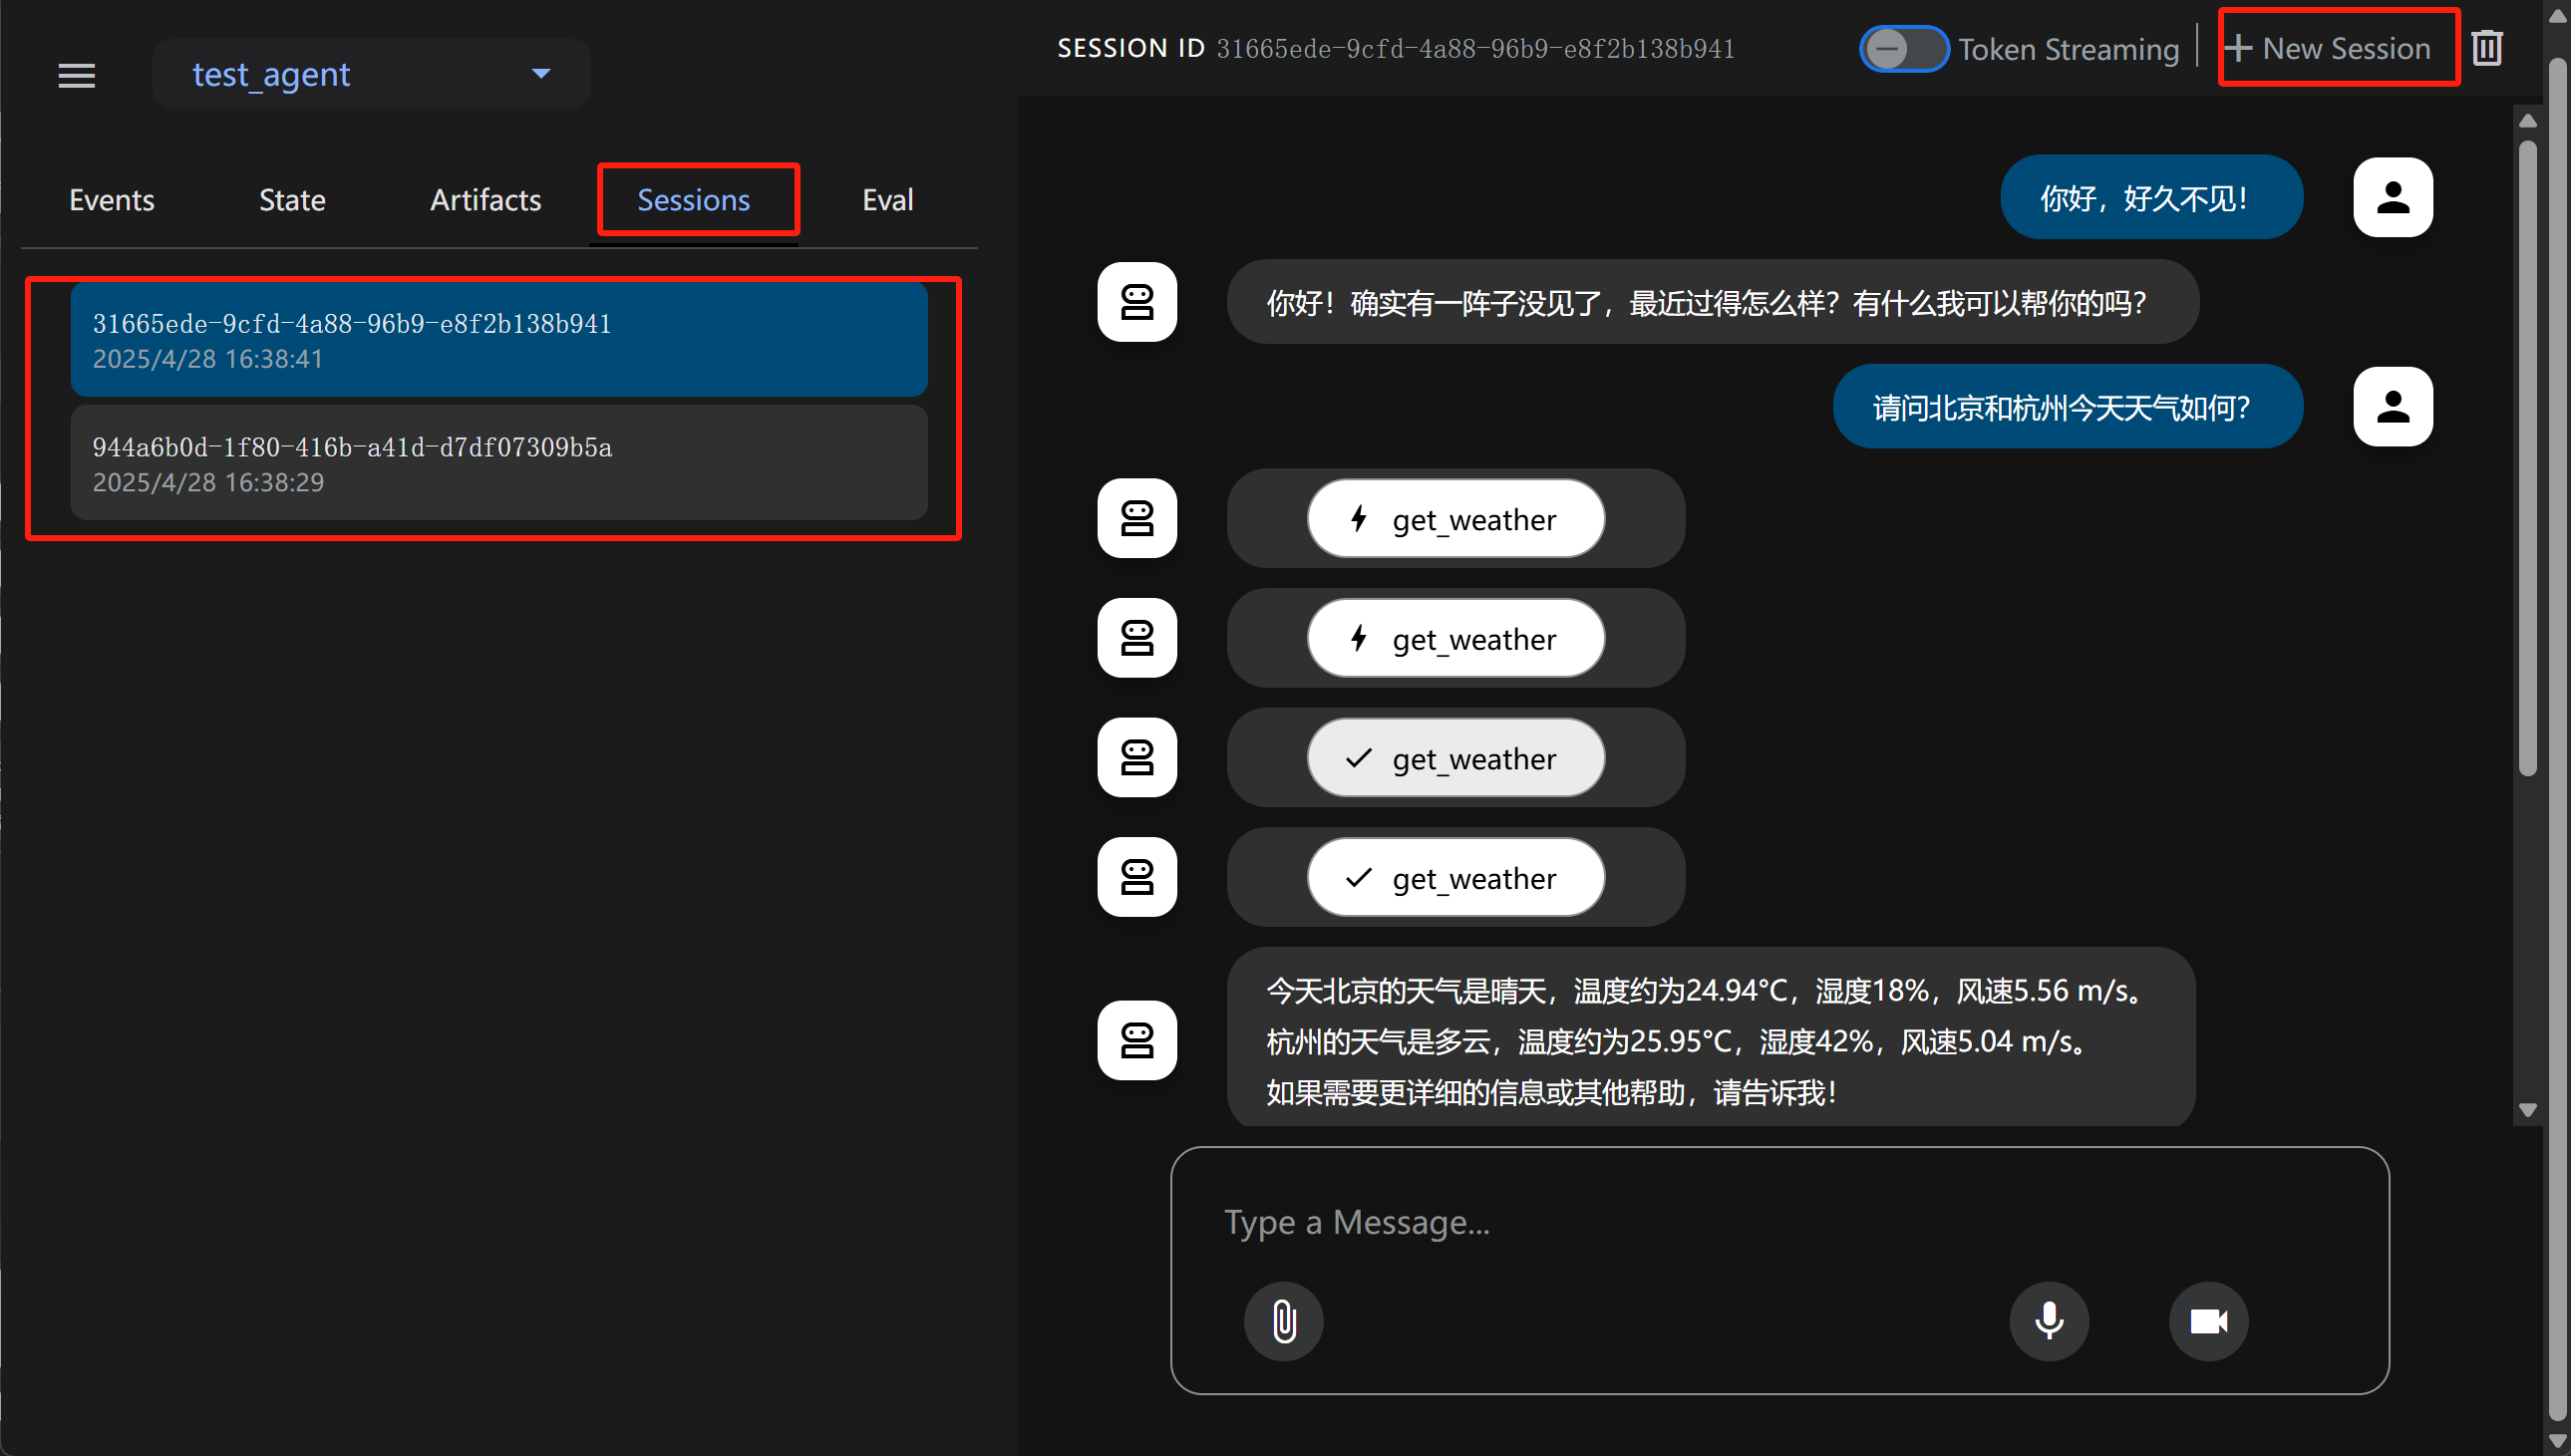
需要注意的是,左侧默认显示的就是现在的事件流,而对话中显示的则是调用工具和响应的情况,同时我们点击对话中的工具选项,还能看到对应的事件:
如点击第一个get_weather,代表的含义是第一次查询天气请求,由Agent发起,属于第二个事件:
类似的,如果点击最后一个write_file,则代表将查询到的信息写入本地,此时对应第8个事件:
同时点击右上角还能开启新的对话,多个历史对话可以在Sessions中进行查看:
完整对话演示流程如下:
Video("https://ml2022.oss-cn-hangzhou.aliyuncs.com/2025-04-28%2016-38-49.mp4", width=800, height=400)
至此我们就完成了基于ADK构建多工具的Agent完整流程。
2. 更多外部工具快速调用流程
此外,在当前项目基础上,我们还能快速添加一些外部工具进行测试。例如添加一个本地查询MySQL的工具,我们只需要先在agent.py脚本进行如下修改:
FENCE0
注,需要提前安装好MySQL,并导入一些表。
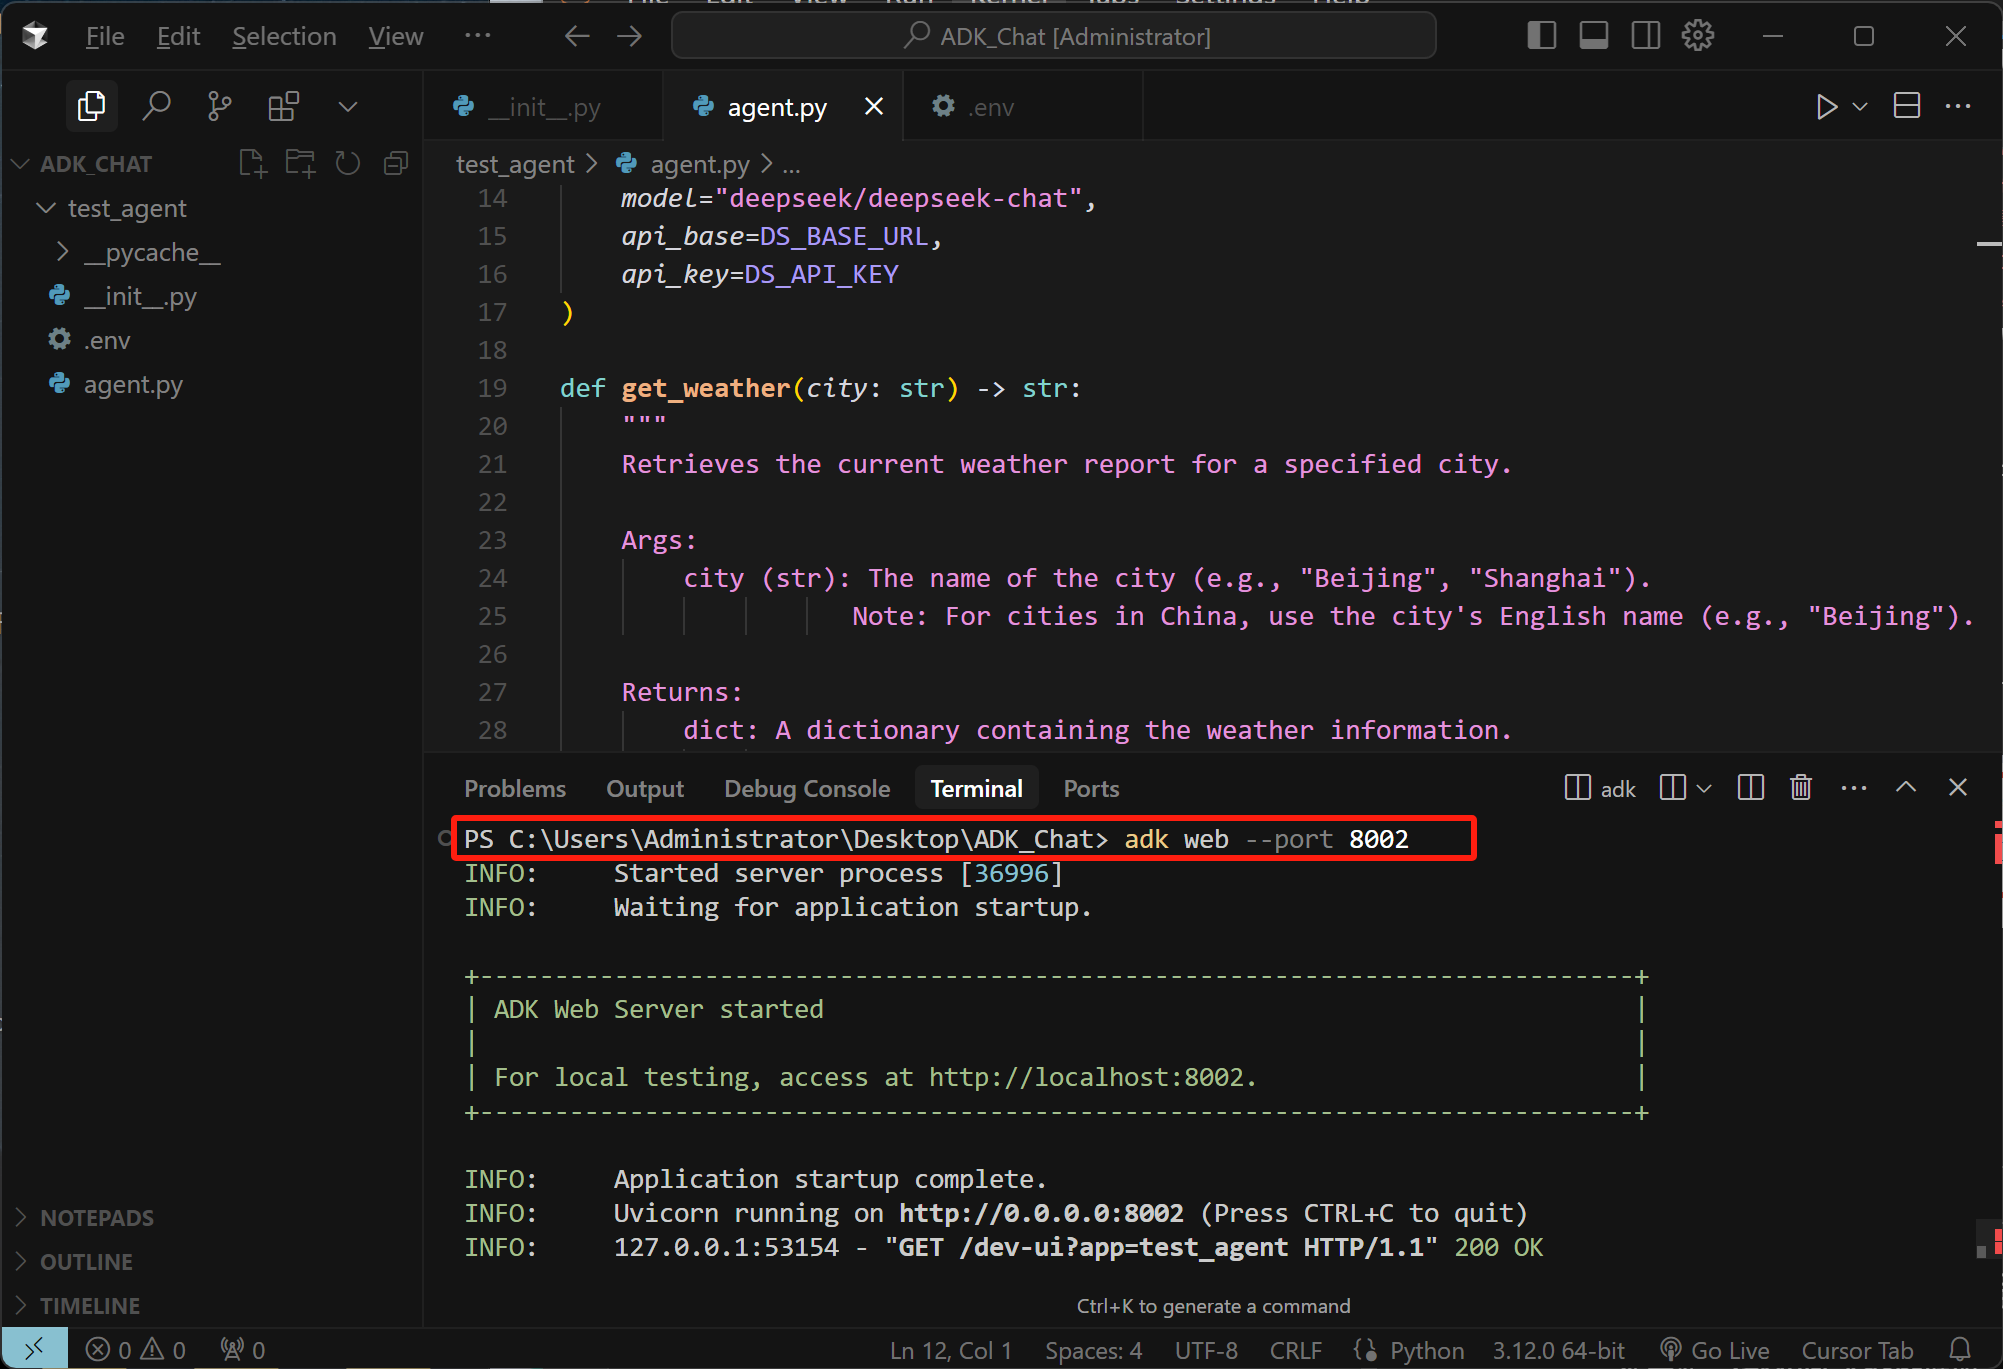
然后尝试运行即可:adk web --port 8002
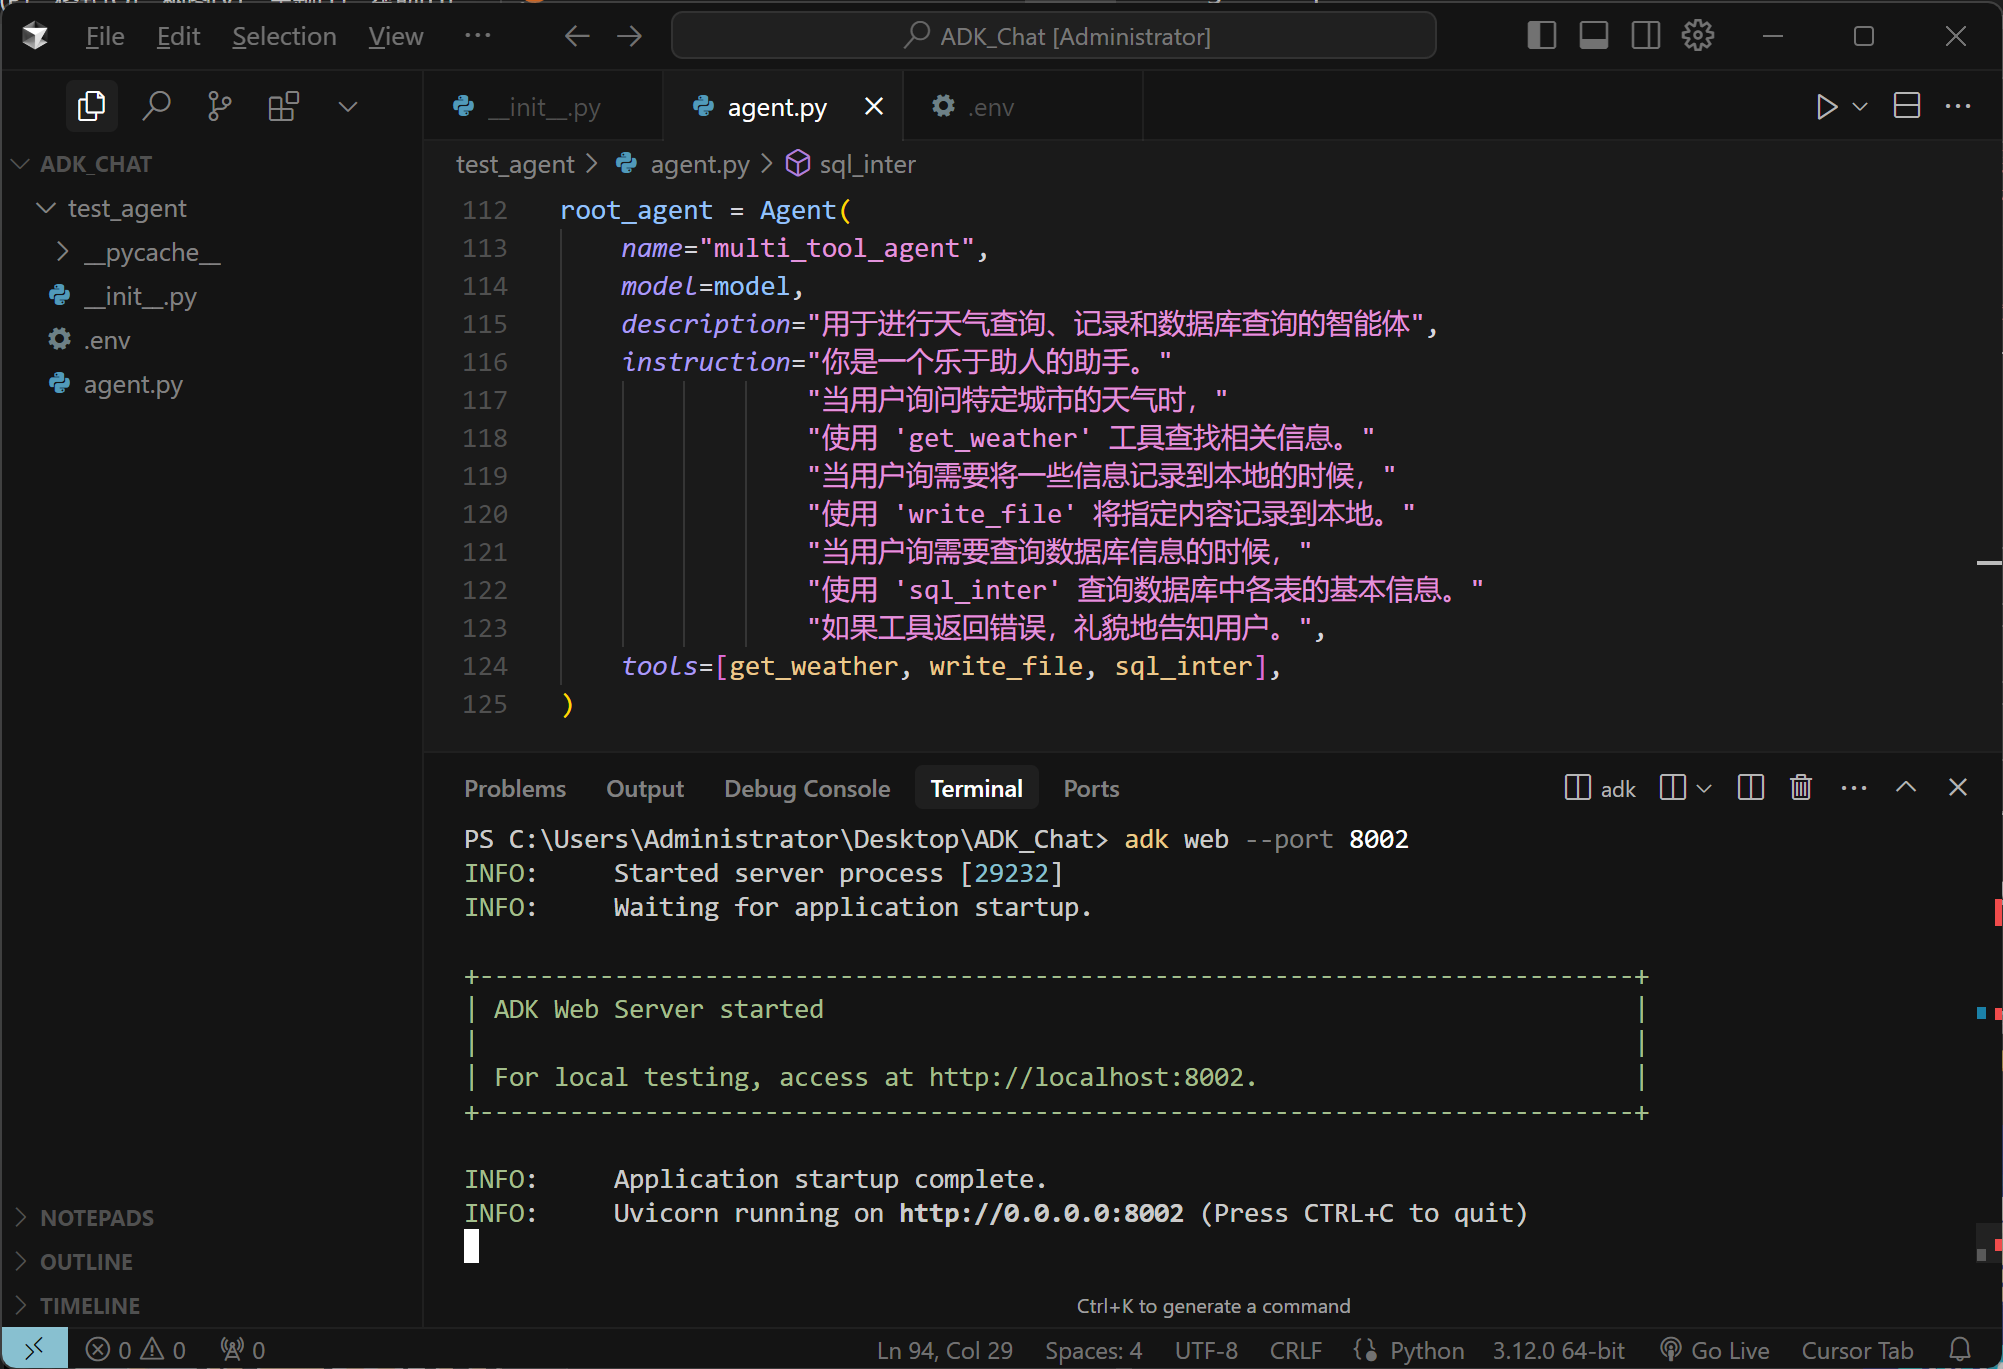
实际运行效果如下所示:
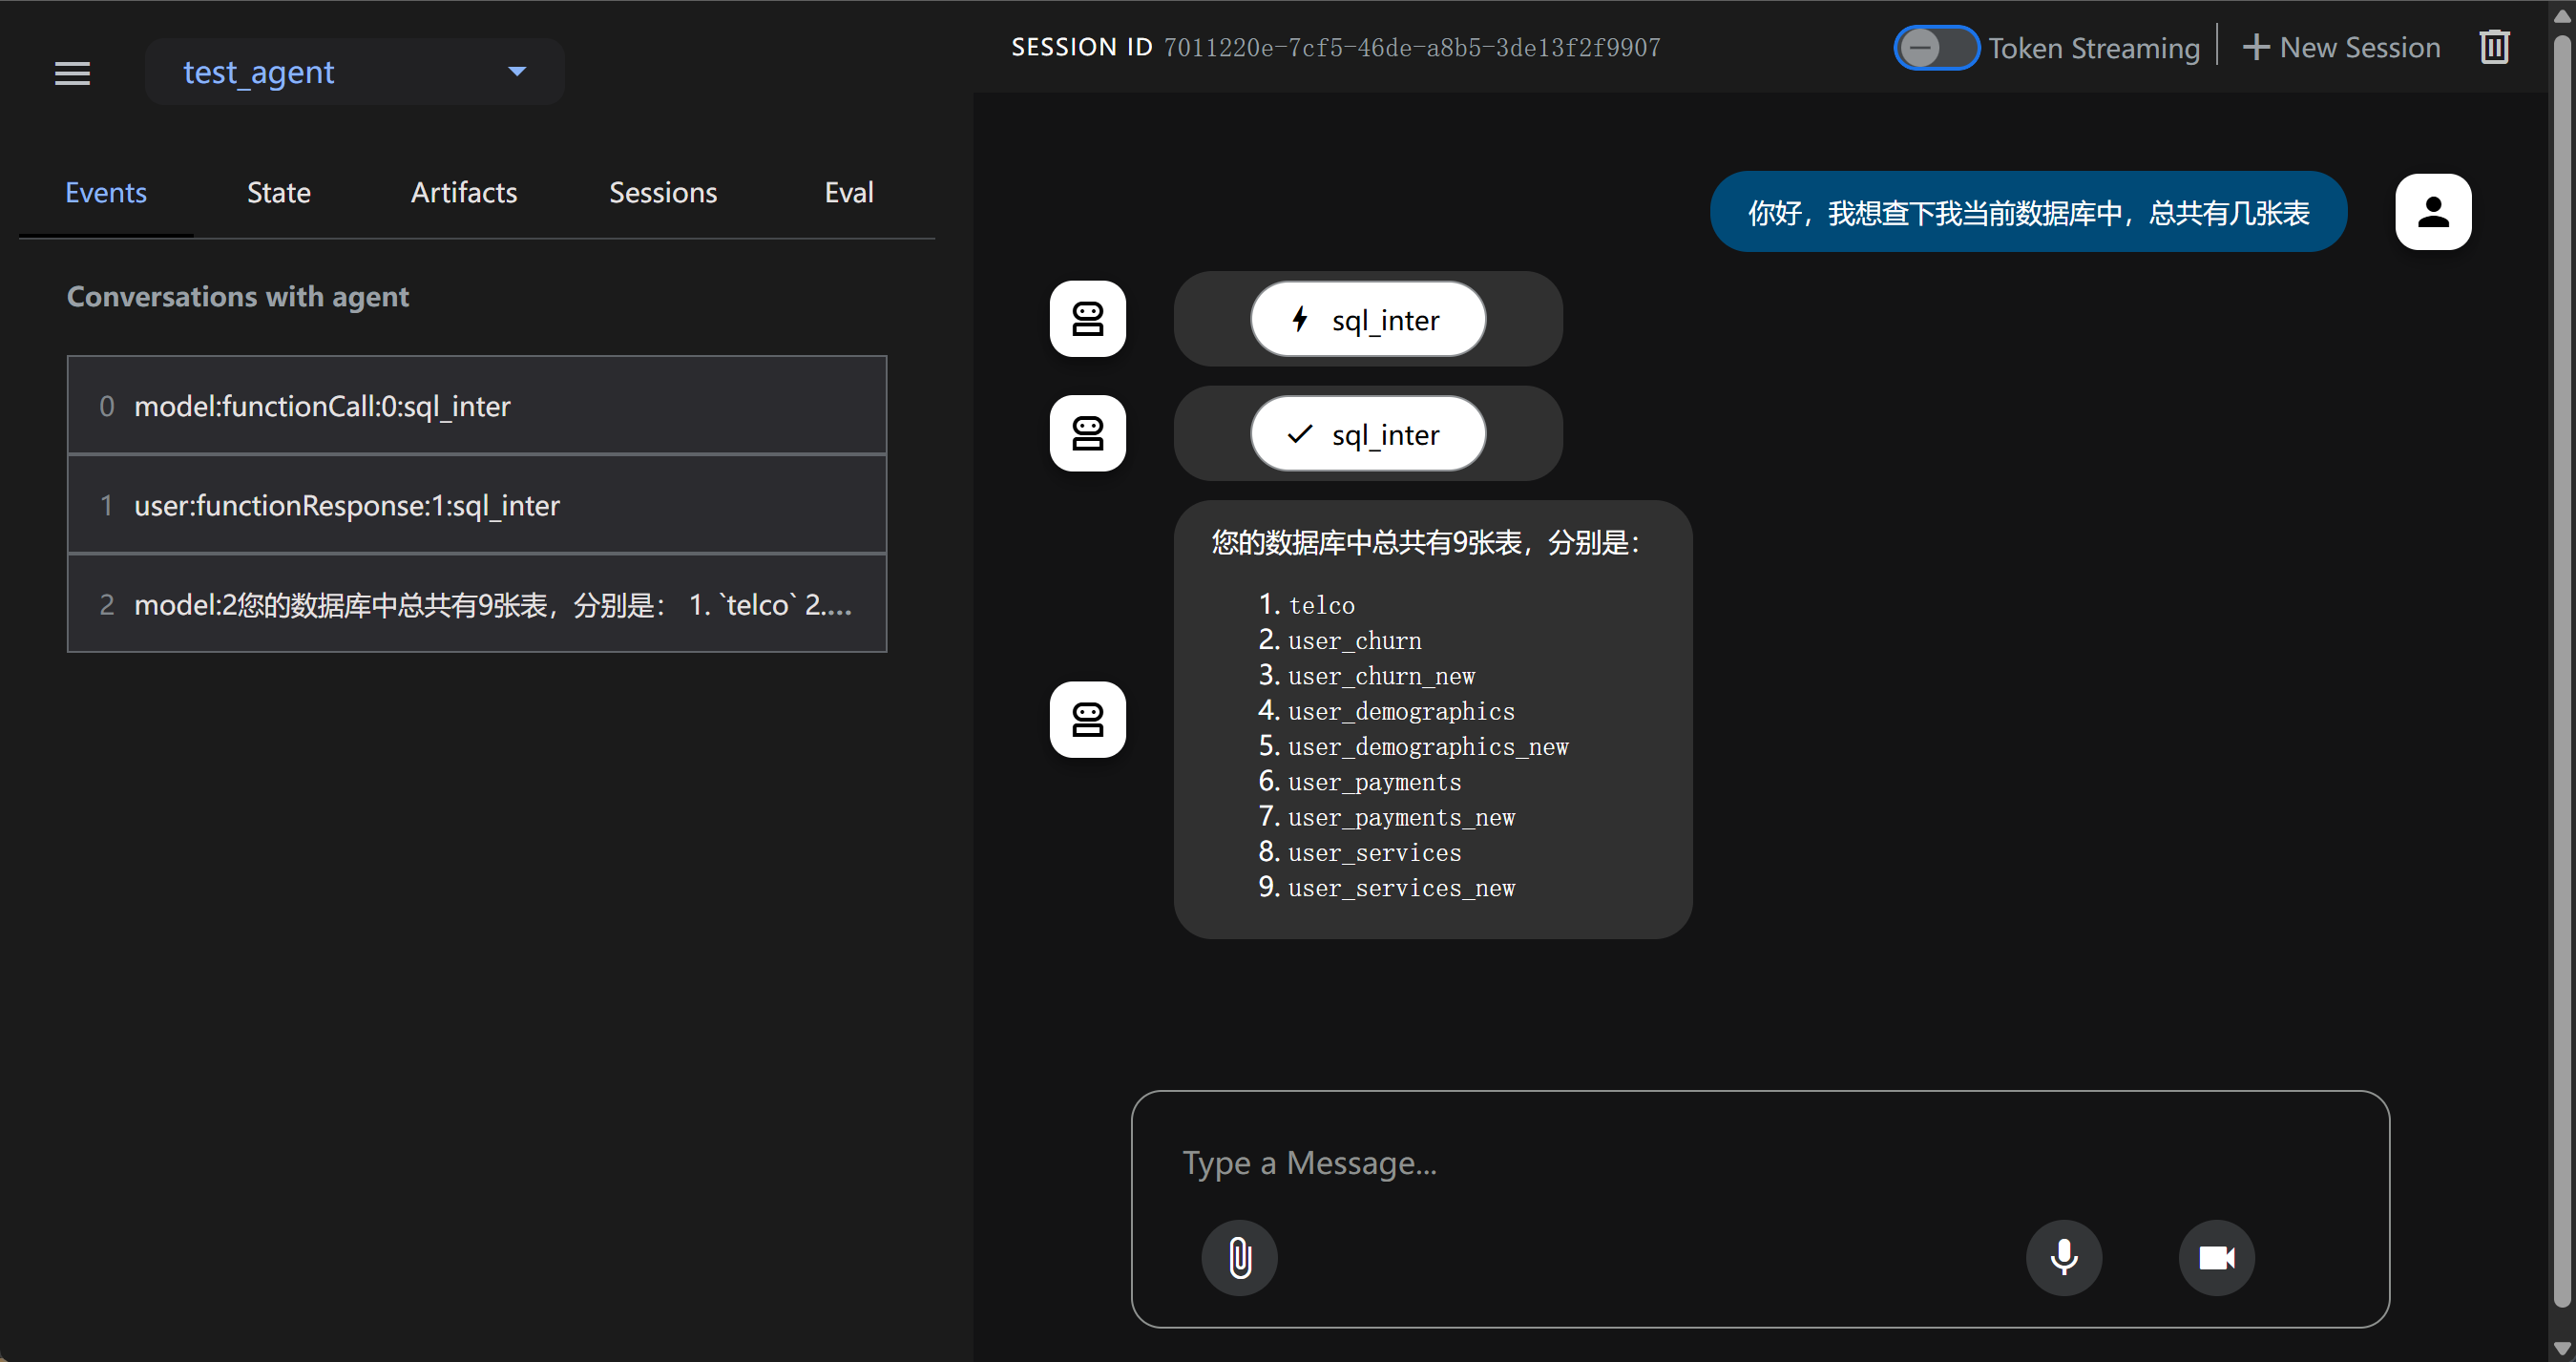
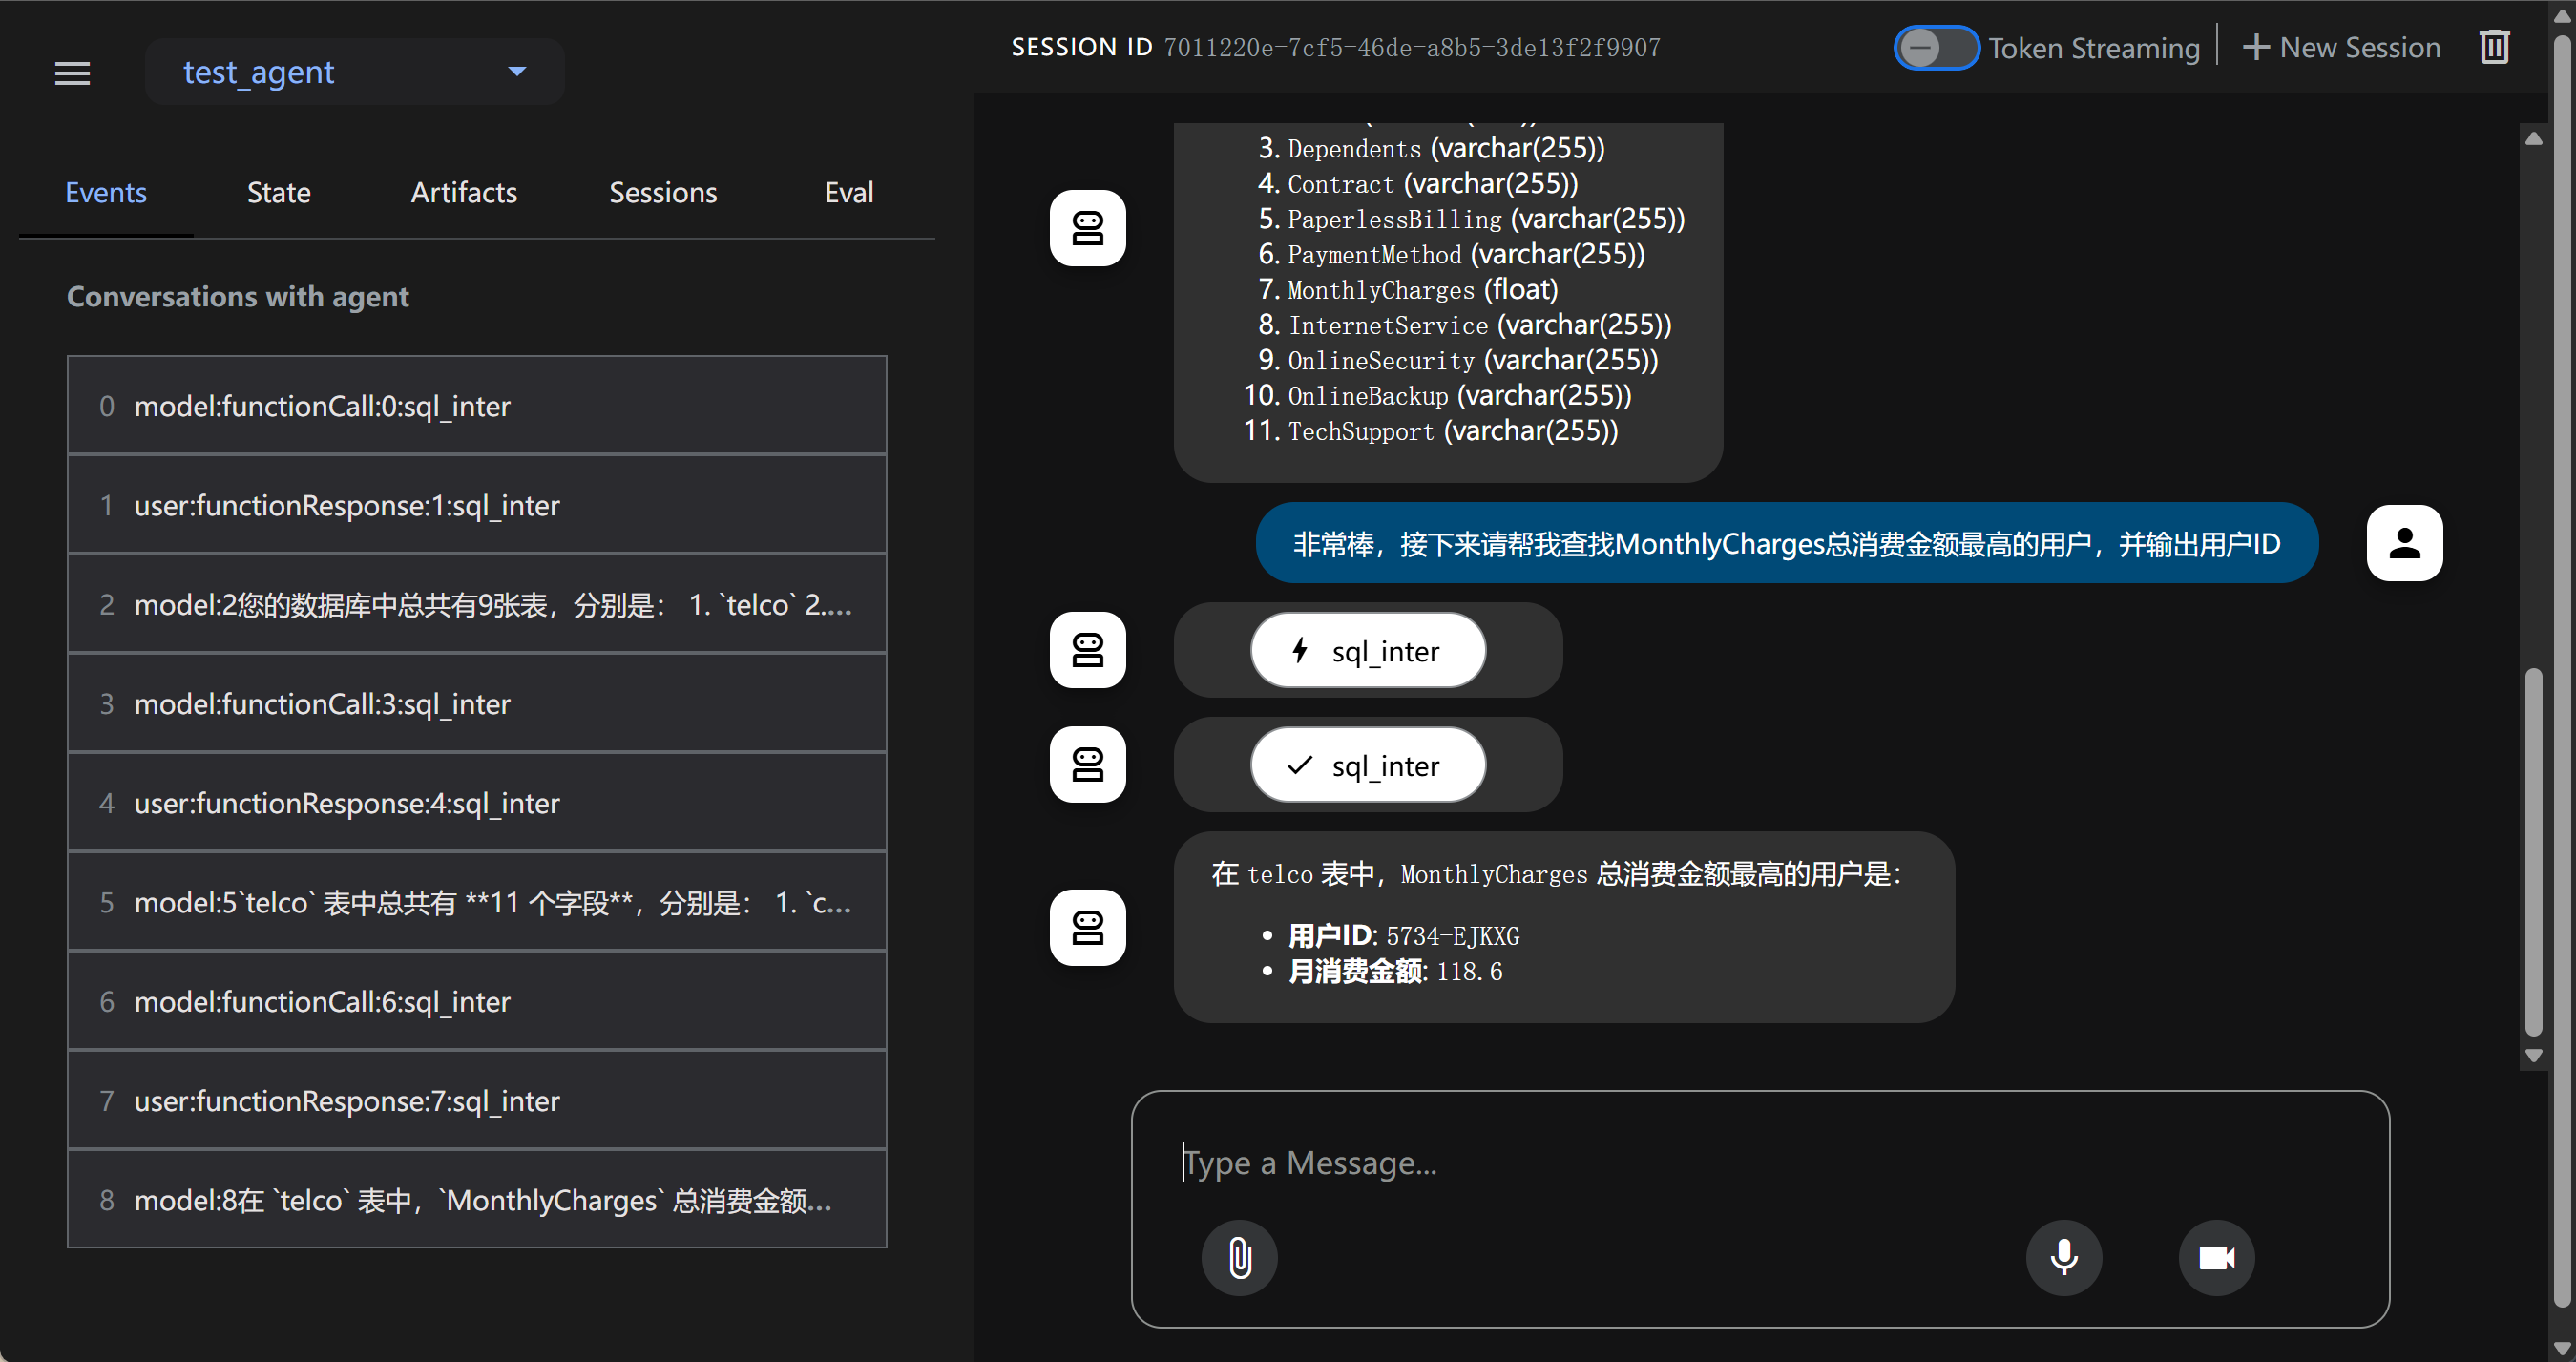
能够发现,借助Dev Web UI,能够非常便捷的进行功能测试。
3. ADK内置工具说明
除了可以自定义工具外,ADK还有非常丰富的内置工具,主要包括以下几类:
- Gemini内置工具:包括谷歌搜索,谷歌云文档检索、代码解释器等工具;
- 其他Agent框架工具:包括LangChain Tavily和 CrewAI工具等;
- Google Cloud工具:谷歌云平台的API为主;
这里以Gemini模型的谷歌搜索为例进行演示:
from google.adk.tools import google_search
from google.genai import types
import os

# 设置代理
os.environ['HTTP_PROXY'] = 'http://127.0.0.1:10080'
os.environ['HTTPS_PROXY'] = 'http://127.0.0.1:10080'

# 设置Gemini-API-KEY
os.environ["GOOGLE_API_KEY"] = "YOUR_GOOGLE_API_KEY"
APP_NAME="google_search_agent"
USER_ID="user1234"
SESSION_ID="1234"


root_agent = Agent(
    name="basic_search_agent",
    model="gemini-2.0-flash",
    description="Agent to answer questions using Google Search.",
    instruction="I can answer your questions by searching the internet. Just ask me anything!",
    # google_search is a pre-built tool which allows the agent to perform Google searches.
    tools=[google_search]
)
session_service = InMemorySessionService()
session = session_service.create_session(app_name=APP_NAME, user_id=USER_ID, session_id=SESSION_ID)
runner = Runner(agent=root_agent, app_name=APP_NAME, session_service=session_service)
query = '请问今日AI热点新闻有哪些?'
await call_agent_async(query, runner, USER_ID, SESSION_ID)
借助谷歌搜索,能高效快速围绕互联网信息进行总结。
** 更多ADK工具和Agent开发工具方法详见正课**
更多关于ADK进阶工具使用方法,以及Agent开发相关内容讲解,详见《2025大模型Agent智能体开发实战》(7月班) 付费课程。详细信息扫码添加助教,回复“大模型”,即可领取课程大纲&查看课程详情👇