【视频课件】AutoGen 代码解释器
公开课内容节选自《大模型与Agent开发》完整版付费课程!
公开课时间有限,若想深度学习大模型技术,欢迎大家报名由我主讲的《大模型与Agent开发实战课》 :

《大模型与Agent开发实战课》 为【100+小时】体系大课,总共20大模块精讲精析,零基础直达大模型企业级应用!
公开课直播特惠,全年最低价!低至 5 折 !扫码咨询课程信息哦👇

MicroSoft AutoGen 代码解释器入门
Code Executors 是 AutoGen 框架中用于执行代码的组件,允许代理执行命令行代码、脚本或其他类型的代码。 代码执行器(Code Executors)在AI Agent 应用开发中是非常基础、且必须具备的一项功能。Agent 的目标是能够理解和执行任务,包括从自然语言中提取意图并执行相关的计算或操作。在很多应用场景,例如数学运算、数据分析等,Agent 都需要执行具体的代码或脚本来完成任务。代码解释器使得 AI Agent 能够动态地解析和执行代码,这对于开发一些复杂、灵活的任务非常关键。AutoGen框架就是通过Code Executors组件使代理(如 ConversableAgent)能够与本地的开发环境进行交互,运行代码并返回结果。
AutoGen开发框架中提供两种代码执行方式,分别是本地执行和容器化执行。 其中:
-
本地执行:代码直接在
AutoGen运行所在的主机平台上执行,适用于开发和测试阶段。尽管本地执行方式简便,但由于大模型可能生成任意代码,这种方式在生产环境中并不建议使用,因为存在大模型生成的代码可能包含潜在的恶意代码或漏洞,直接在本地执行可能对主机系统构成安全威胁,直接在本地执行代码可能导致资源冲突,影响其他服务的稳定性等多种因素影响。 -
容器化执行:代码在
Docker容器中运行,为生产环境提供更高的安全性、资源隔离性和一致性。容器化执行方式确保了代码在隔离的环境中运行,减少了与主机系统的直接交互,因此更适合用于生产部署。
我们先来看在本地环境下运行代码执行器的方法。
1. 使用本地代码执行器
在AutoGen框架中使用本地代码执行器,需要使用到LocalCommandLineCodeExecutor类,它内部构建的逻辑就是用来通过本地的命令行接口执行脚本和命令。其源码位置如下:
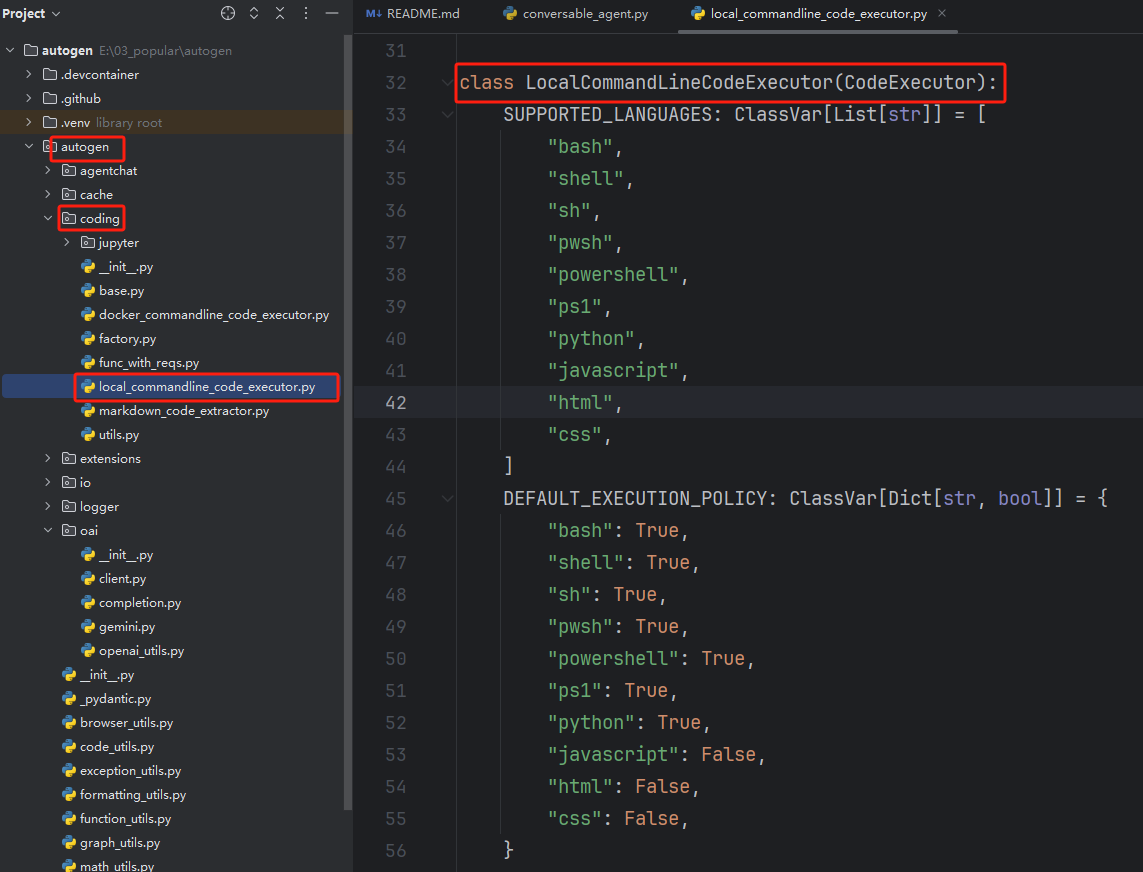
该内置类支持以下多种编程语言,分别是:
- 脚本语言:bash, shell, sh, pwsh, powershell, ps1
- 编程语言:python, javascript
- 标记语言:html, css
以及设置了默认执行策略,可以通过 DEFAULT_EXECUTION_POLICY 参数字典定义,决定每种语言的代码块是否应该被执行,即:
- 允许执行:bash, shell, sh, pwsh, powershell, ps1, python
- 不允许执行,仅保存:javascript, html, css
LocalCommandLineCodeExecutor类实现的本地命令行代码执行器实际的执行逻辑如下图所示:

从上述逻辑图中可以看出,LocalCommandLineCodeExecutor 的执行逻辑是:首先将收到的代码块写入一个临时文件,然后通过子进程执行该文件。执行过程中,它会捕获并返回命令行的标准输出和标准错误信息,作为回复消息返回给用户。同时,其可以用的初始化参数如下所示:
FENCE0
我们可以针对初始化参数依次展开详细的使用说明以及各个参数的应用场景和构建技巧。
- timeout 与 workdir 参数解析
首先创建一个文件夹来存储代码和生成的结果。代码如下:
import os

# 定义用于存储代码和结果的文件夹名称
folder_name = "code_executor_output"

# 获取当前工作目录
current_dir = os.getcwd()

# 将当前工作目录与文件夹名称结合,得到完整的文件夹路径
folder_path = os.path.join(current_dir, folder_name)

# 如果文件夹不存在,则创建该文件夹
os.makedirs(folder_path, exist_ok=True)
定义LocalCommandLineCodeExecutor代码执行器实例,代码如下:
from autogen.coding import LocalCommandLineCodeExecutor

# 创建本地命令行代码执行器,使用刚刚创建的文件夹作为工作目录
executor = LocalCommandLineCodeExecutor(
    timeout=10,  # 每次代码执行的超时时间,单位为秒
    work_dir=folder_path,  # 使用当前路径下创建的文件夹来存储代码文件
)
通过上面的代码定义后,所有的代码文件和生成的结果都会被存储在当前目录下的 code_executor_output 文件夹中。如果该文件夹不存在,程序会自动创建它。接下来则可以定义ConversableAgent代理实例。
唯一与之前内容不同的是,这里我们需要掌握ConversableAgent类初始化参数中code_execution_config的使用。该参数可以指定代理应该使用哪个代码执行器。我们在这里将其设置为刚刚定义的executor。代码如下:
from autogen import ConversableAgent

# 创建一个带有代码执行器配置的代理
code_executor_agent = ConversableAgent(
    name="code_executor_agent",  # 代理的名称
    llm_config=False,  # 使用Fasle 说明暂时不需要大模型接入
    code_execution_config={"executor": executor},  # 使用本地命令行代码执行器
)
现在便可以使用 code_executor_agent 来执行代码,其结果会存储在指定的文件夹中。比如我们做如下测试:
# 在这个示例中,我们执行代码来生成散点图并保存图像,但不会打印任何内容。

message_with_code_block_no_print = """This is a message with code block.
The code block is below:
```python
import numpy as np
import matplotlib.pyplot as plt
x = np.random.randint(0, 100, 100)
y = np.random.randint(0, 100, 100)
plt.scatter(x, y)
plt.savefig('scatter_no_print.png')
"""
# 生成给定代码的回复
reply = code_executor_agent.generate_reply(messages=[{"role": "user", "content": message_with_code_block_no_print}]) print(reply)
  如上所示,代码执行过程的输出部分(`exitcode: 0 (execution succeeded)`)表示代码成功执行,没有错误。`Code output:` 之后没有任何输出,因为在代码中没有调用 `print` 函数,唯一的操作是保存一个图像文件 `scatter_no_print.png`。我们可以查看`code_executor_output`文件夹下是否正常存储代码以及生成的图片。
<div align=center><img src="https://muyu20241105.oss-cn-beijing.aliyuncs.com/images/202501021814913.png" width=90% /></div>
  我们可以通过 `IPython.display.Image`方法在当前的`Python`环境中显示已保存的图像:scatter_no_print.png
```python
from IPython.display import Image
image_path = os.path.join(folder_path, "scatter_no_print.png")
# 使用 IPython.display.Image 显示图像
Image(image_path)
接下来的这个示例,我们执行代码来生成散点图并保存图像,同时在控制台打印保存成功的提示内容,代码如下所示:
message_with_code_block_no_print = """This is a message with code block.
The code block is below:
```python
import numpy as np
import matplotlib.pyplot as plt
x = np.random.randint(0, 100, 100)
y = np.random.randint(0, 100, 100)
plt.scatter(x, y)
plt.savefig('scatter_with_print.png')
print('Scatter plot saved to scatter_with_print.png')
"""
生成给定代码的回复
reply = code_executor_agent.generate_reply(messages=[{"role": "user", "content": message_with_code_block_no_print}]) print(reply)
  如果代码中有`print`语句,则会放在`Code output`字段后。
```python
# 使用 split 提取 Code output 部分
code_output_start = reply.split('Code output:')[-1].strip()
code_output_start
executor.work_dir
除此以外,除了加载当前代码环境所使用的Python虚拟环境,LocalCommandLineCodeExecutor 也可以通过 virtual_env_context参数来加载指定的虚拟环境。这是一个非常有用的功能,尤其是在需要确保特定的 Python 环境或依赖库时,通过虚拟环境隔离执行环境,可以避免与系统级别的依赖冲突。为了实践这个功能,我们需要先创建一个全新的Python虚拟环境。代码如下:
from autogen.code_utils import create_virtual_env

# 创建一个虚拟环境上下文
venv_dir = ".venv"
venv_context = create_virtual_env(venv_dir)
import os

# 定义用于存储代码和结果的文件夹名称
folder_name = "code_executor_output_local_venv"

# 获取当前工作目录
current_dir = os.getcwd()

# 将当前工作目录与文件夹名称结合,得到完整的文件夹路径
local_folder_path = os.path.join(current_dir, folder_name)

# 如果文件夹不存在,则创建该文件夹
os.makedirs(local_folder_path, exist_ok=True)
将新的虚拟环境配置到LocalCommandLineCodeExecutor代码解释器中。
from autogen.coding import LocalCommandLineCodeExecutor

# 创建本地命令行代码执行器,使用刚刚创建的文件夹作为工作目录
executor = LocalCommandLineCodeExecutor(
    timeout=10,  # 每次代码执行的超时时间,单位为秒
    work_dir=local_folder_path,  # 使用当前路径下创建的文件夹来存储代码文件
    virtual_env_context=venv_context
)
运行测试:
from autogen import ConversableAgent

# 创建一个带有代码执行器配置的代理
code_executor_agent = ConversableAgent(
    name="code_executor_agent",  # 代理的名称
    llm_config=False,  # 使用Fasle 说明暂时不需要大模型接入
    code_execution_config={"executor": executor},  # 使用本地命令行代码执行器
)

# 在这个示例中,我们执行代码来生成散点图并保存图像,但不会打印任何内容。

message_with_code_block = """This is a message with code block.
The code block is below:
```python
import numpy as np
x = np.random.randint(0, 100, 100)
y = np.random.randint(0, 100, 100)
print(x)
print(y)
"""
生成给定代码的回复
reply = code_executor_agent.generate_reply(messages=[{"role": "user", "content": message_with_code_block}]) print(reply)
  当通过 `virtual_env_context` 加载了虚拟环境并执行代码时,如果代码块中使用了虚拟环境中尚未安装的依赖包,执行时就会报错,因为这些包在虚拟环境中并不存在。`TypeError: can only concatenate str (not "NoneType") to str` 这个错误,通常发生在代码执行过程中某些变量是 `None`(例如,`stderr` 或 `stdout` 为空或没有返回值),这很可能是由于执行过程中,系统尝试输出错误日志,但某些输出为空。
  这里用到的依赖包是`numpy`,所以我们先手动安装一下再次进行尝试,代码如下:
```python
import subprocess
import sys
venv_path = r"E:\01_木羽研发\04_Agent正课\15_AutoGen\.venv\Scripts\python.exe"
command = [venv_path, "-m", "pip", "install", "numpy"]
# 执行命令
result = subprocess.run(command, capture_output=True, text=True)
# 打印结果
print(result.stdout)
print(result.stderr)
安装后再次尝试运行,代码如下:
from autogen import ConversableAgent

# 创建一个带有代码执行器配置的代理
code_executor_agent = ConversableAgent(
    name="code_executor_agent",  # 代理的名称
    llm_config=False,  # 使用Fasle 说明暂时不需要大模型接入
    code_execution_config={"executor": executor},  # 使用本地命令行代码执行器
)

# 在这个示例中,我们执行代码来生成散点图并保存图像,但不会打印任何内容。

message_with_code_block = """This is a message with code block.
The code block is below:
```python
import numpy as np
x = np.random.randint(0, 100, 100)
y = np.random.randint(0, 100, 100)
print(x)
print(y)
"""
生成给定代码的回复
reply = code_executor_agent.generate_reply(messages=[{"role": "user", "content": message_with_code_block}]) print(reply)
  此时再使用则可以正常运行。
```python
from autogen import ConversableAgent
# 创建一个带有代码执行器配置的代理
code_executor_agent = ConversableAgent(
name="code_executor_agent", # 代理的名称
llm_config=False, # 使用Fasle 说明暂时不需要大模型接入
code_execution_config={"executor": executor}, # 使用本地命令行代码执行器
)
# 在这个示例中,我们执行代码来生成散点图并保存图像,但不会打印任何内容。
message_with_code_block = """This is a message with code block.
The code block is below:
```python
print("eng")
"""
生成给定代码的回复
reply = code_executor_agent.generate_reply(messages=[{"role": "user", "content": message_with_code_block}]) print(reply)
  除了依赖包缺失会出现执行异常情况外,如果输入的是中文字符,在`Windows`开发环境下会报错为`UnicodeDecodeError: 'utf-8' codec can't decode byte 0xb9 in position 0: invalid start byte`, 那么一种有效的解决办法是修改`AutoGen`的源码,代码如下:
<div align=center><img src="https://muyu20241105.oss-cn-beijing.aliyuncs.com/images/202501031440060.png" width=90% /></div>
  因此需要重点说明的是:因为我们采用`AutoGen`依赖包的调用方法,所以编码问题并没有很好的解决办法,因为没有办法去直接更改`AutoGen`项目的源码。同时,如果大家采用`Linux`或者`Mac`系统进行开发,该编码问题是不存在的,所以这也反映了`Windows`开发环境的兼容在很多情况下都存在比较多的问题。
  那么如何解决在`Windows`系统下的字符编码问题的,主要有两种方式:**其一是采用源码安装,修改代码并编译后,通过调用新的代码逻辑处理字符编码问题**。而关于源码使用`AutoGen`的方法,我们在接下来的课程中再给大家展开详细的介绍。 **其二则是使用它的`Docker`容器运行代码执行器。**
  大家可以关注我的B站账号:木羽Cheney 。我将继续更新`AutoGen`的相关课程。同时,`AutoGen`的系统性讲解以及其他`AI Agent`热门框架如`LangGraph`、`CrewAI`、`Coze`、`Dify`、`Swarm`等,在我们的正式课程中均有保姆级的讲解, **<span style="color:red;">公开课直播特惠,全年最低价!低至 5 折 !扫码咨询课程信息哦👇</span>**
<img src="https://muyu20241105.oss-cn-beijing.aliyuncs.com/images/202412261505711.jpg" alt="1728478294264" style="zoom:80%;" />
<span style="color:red;">**公开课内容节选自《大模型与Agent开发》完整版付费课程!**</span>
公开课时间有限,若想深度学习大模型技术,欢迎大家报名由我主讲的[《大模型与Agent开发实战课》](https://whakv.xetslk.com/s/432wPY) :
<img src="https://ml2022.oss-cn-hangzhou.aliyuncs.com/img/4a3bf26aef95abca48eafdec1f47397.jpg" alt="4a3bf26aef95abca48eafdec1f47397" style="zoom:23%;" />
**[《大模型与Agent开发实战课》](https://whakv.xetslk.com/s/432wPY) 为【100+小时】体系大课,总共20大模块精讲精析,零基础直达大模型企业级应用!**
<div align=center><img src="https://muyu20241105.oss-cn-beijing.aliyuncs.com/images/202412051620392.png" width=80% /></div>